

|
|

|
|
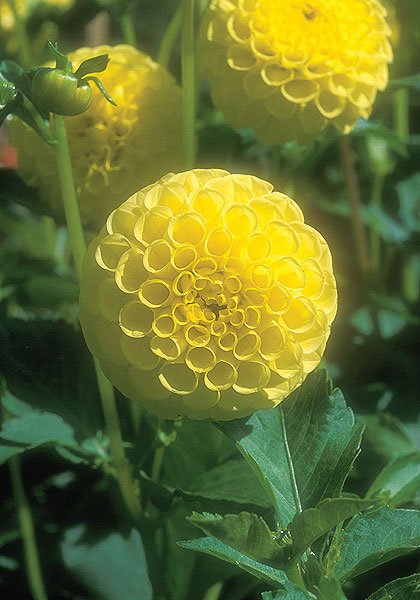
Exquisite in its symmetry, this perfect little pompon dahlia seems to have been shaped by a jeweler from Middle Earth. Or maybe it will remind you of your childhood backyard twinkling with lightning bugs. Either way, it’s one of our oldest and rarest dahlias, excellent in bouquets, and a true delight. 1-2” pompons, 3’ tall, from Oregon. Last offered in 2013, and we’re not planning to offer it again. Sorry! |
|
TYPE pompon SUB TYPE pompon, pompom, ball, 1-2 inches, American ZONES 3a-7b(10bWC) HEIGHT 3-4’ SOURCE Oregon, America LIGHT full sun |
PLANTING & CAREDon’t be surprised if your dahlia tubers all look different – and unlike those from mainstream sources. The ones from the Netherlands are often scruffy clusters of tubers while the ones from our American growers are single, neatly trimmed tubers known as “chicken legs” (even though some of them look more like golf balls or string beans). All will produce plants of equal quality, equally fast. The difference is simply due to Nature’s diversity and the way the tubers are produced: small-scale, traditional growing in the US vs. modern “pot-root” production in Holland. Some of the tubers in the pot-root clusters may have “broken necks” and be dangling from the crown by just a few threads. You can leave them but since they probably won’t grow, you may want to break or cut them off. You only need one good, well-connected tuber in each cluster to make a full-size plant. Don’t plant outside too early! Wait till after all danger of frost is past — when you’d plant tomatoes or later. That may mean you have to store your tubers for a month or more. Open the bags and leave them loose at the top so air can circulate. Store in a cool, dim-to-dark place. 40-45° F is ideal, but warmer — even cool room-temperature — works, too. If your tubers sprout while waiting to be planted, it’s not a big deal. You could pot them up and start them indoors, but it’s not essential. If a sprout breaks off, don’t panic. Usually several more will emerge at the base of the broken one. For a longer season of bloom, you can start tubers inside 4-6 weeks early and transplant them outside when it warms up, which is what we do. Be careful not to over-water pots, especially at first. Give strong sun, or set outside on warm days. Dahlias thrive in light, fertile, well-drained soil. If your soil is heavy (clay), add organic material or plant in raised beds. Full sun is best, but eight hours will do. Dahlias do NOT like extreme heat (they’re native to cool mountain plateaus in Mexico), so avoid hot spots such as near south or west walls, and if you garden in the Deep South or other hot areas, see our special tips below. Space your dahlias 18-24 inches apart. Dig a hole a foot deep and wide; enrich the soil and return some to the hole. Pound a sturdy stake into the ground near the center of the hole so that 3-7 feet of it remain above ground level (depending on the ultimate height of the dahlia). In front of this, lay the tuber horizontally with the eye, if visible, pointing up — or set the entire pot-root cluster with the stem facing up — about 6 inches below ground level. Cover with 2-3 inches of soil. If your soil is moist, DON’T WATER tubers until they sprout. In soggy soil, un-sprouted tubers are prone to rot. If your soil is dry or the weather is hot, you will need to water, but don’t overdo it — till sprouts emerge. As shoots grow, gradually add soil till the hole is filled. For bushier plants, “top” them after they get three sets of leaves by pinching or cutting out the center shoot. If slugs or snails are a big problem in your area, consider using bait. Water only as needed during the growing season, and fertilize lightly monthly until early fall. Don’t over-feed! AVOID HIGH NITROGEN FERTILIZERS such as lawn fertilizer. Use balanced rose, tomato, or general garden fertilizer instead. Hand-weed; avoid ALL herbicides. Dead-head by cutting spent blooms to encourage more vigorous flowering — or simply pick lots of bouquets! Dahlias like cool conditions (they long for the cool mountain plateaus of Mexico), so growth and flowering peak as temperatures cool in late summer and early fall. Staking dahlias is a lot like staking tomatoes, except dahlias are easier. We find that double strands of garden twine work well, and if it’s green it all but disappears. Tying individual stalks or at most a few at a time to the stake usually looks much better than tying a big bundle all together. As the stalks continue to grow, you’ll have to tie them again higher up. Some growers use wire-hoop “tomato towers” along with the stakes and let the dahlias pretty much support themselves within the towers. For more guidance, see dahlias.net/dahwebpg/Support/Support.htm. IN THE SOUTH AND WARM WEST — To grow and bloom well, most dahlias need cool night temperatures — as in the Mexican highlands where they’re native — which is why we recommend them only for zones 4-7b in most of the country and 4-9b on the West Coast where summers are cooler. But some dahlias can handle warm nights better than most, and we recommend these varieties — noted as “heat-tolerant” in their descriptions and “heat-ok” in our dahlia chart — through zone 8b in most of the country and 10b on the West Coast. According to our friend John Kreiner of the Dahlia Society of Georgia, there are two keys to getting dahlias to thrive where summers are hot: (1) mulch them, and (2) choose heat-tolerant varieties. To learn more from John and our dahlia-loving customers in zones 8 and 9, go to oldhousegardens.com/DahliasForHotNights . In zones 8-11 you can leave your dahlias in the ground all winter. Add 4-6 inches of mulch directly over the tubers. Most growers cut the stalks down at some point, and John recommends capping each with a bit of tin foil and a rubber band so water doesn’t collect in them and rot the crown and next year’s sprouts. Dig and divide tubers every 2-3 years. WINTER CARE — In zones 7 and colder, if you want to save tubers for re-planting the next spring, wait a week or so after the foliage has been “blackened” by frost, to allow tubers to harden and fully mature. The soil will generally protect them from freezing. Then cut the stalks off a few inches above ground level. You’ll find that the tubers you planted in early summer will have increased into much larger clumps, so be careful when digging — start at least a foot away from the stalks. Tag each clump with its name, wash off all soil, and allow it to dry upside down in a cool, dry place for a day or two, no more. Divide the clumps with a sturdy knife in fall or spring. Be sure a piece of the “crown” — the thickened area where the stem meets the tuber — remains attached to every clump, because the eyes (often more visible in fall) are located there. You may want to dust cuts with a fungicide such as garden sulfur. At the least allow cuts to air dry for a full day before storage. Store in plastic grocery bags, in plastic garbage bags inside boxes, or in covered plastic storage boxes to help keep the tubers from dehydrating. Pack in coarse vermiculite, peat moss, wood-shavings, or something similar. Store in a cool, dry, dark place, ideally at 40-45° F. Check every now and then. Allow excess moisture to escape (look for condensation) or sprinkle some water on tubers if they seem to be shriveling. Or here’s an easy way recommended by Marian and Bernard Mandella and Richard Peters in the Bulletin of the American Dahlia Society, September 2001. “Tear off a sheet of plastic wrap 20 or more inches long and lay it flat on a level surface. Place a [divided, dusted, and dried] tuber on one end and roll the plastic wrap over one complete turn. Lay another alongside and roll again. Be certain that no tuber is touching another. . . . You may wrap up to five tubers or so per package, but in the last 5-7 inches, fold over the side portions of the plastic wrap and continue to roll to completion. Fasten with a piece of masking tape that is labeled with the cultivar’s name. . . . There is essentially no loss from shriveling or drying.” Some of our customers who grow dahlias in pots just bring them inside and let them dry out and over-winter right in their pots. Others grow them in 5-gallon or even 1-gallon black plastic nursery pots that they bury in the garden and then dig up and store in the basement through winter. You may want to experiment with these extra-easy storage methods, too! Learn more about growing and enjoying dahlias at our Dahlias Newsletter Archives and Bulbs as Cut-Flowers page. |
|
|
SUMMER
|
· |
FALL
|
· |
SPRING
|
· |
LEARN MORE
|
· |
ORDERING
|
|


