
Here’s a wealth of GARDENING TIPS from our email Gazette and past catalogs, starting with the most recently published. For other topics, please see our main Newsletter Archives page.
To subscribe to our FREE email newsletter, click here.
For more tips from our Archives, see:
Bulbs for the South (and Other Warm Areas),
Crocus, Daffodils, and other bulb-specific pages in our Archives By Topic list.
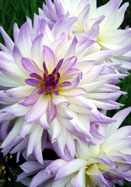
Dahlia Confusion: Is That a Bud or Seedpod?
It’s dahlia season and hopefully yours are full of flowers. (If not, the hot summer probably slowed them down, but hang in there. Cooler temperatures spur growth and bloom.)
Deadheading – which means cutting off the fading flowers – will help you get the most out of your dahlias. It keeps your garden looking neat, allows the plants to redirect energy from making seeds to more flowers, and it gives you a close-up view of your dahlias’ awesome beauty.
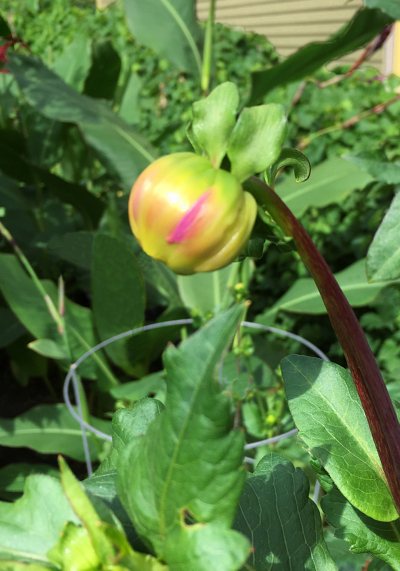
But since we’re all living in the real world instead of a garden book, there may be times when you don’t quite manage to cut every fading flower before all of its petals have dropped. When that happens, you’ll find that some seedpods look a lot like buds. Here’s how to tell them apart – most of the time.
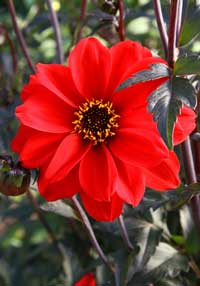
Dahlia buds usually look like flattened balls, as you can see in the photo on the left.
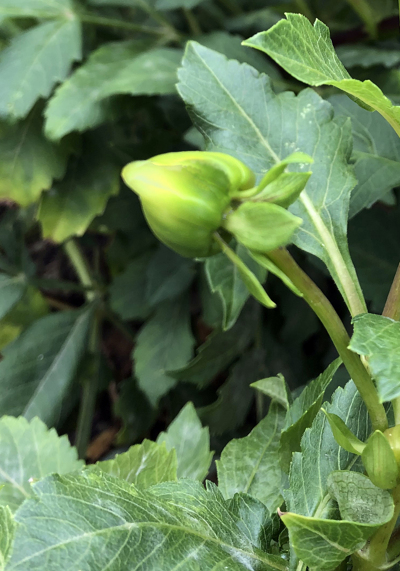
Dahlia seedpods, on the other hand, usually have a longer, more conical shape, as in the photo on the right.
Unfortunately, this isn’t a hard and fast rule because dahlias are wonderfully diverse. The buds of ‘Nonette’, for example, are cone-shaped, while the seedpods of single dahlias are often cylindrical. But if you remember to (a) look at other buds on the plant and (b) keep the flattened-ball vs. longer/conical distinction in mind, you should be able to deadhead with confidence.
Good luck, and enjoy your dahlias! (September 2019)
“Can You Grow Dahlias in One-Gallon Pots?”
“Yes indeed,” wrote Rolf Reisgies, in the March 2018 Bulletin of the American Dahlia Society. “Nothing to it!
You may remember we reported on this a couple of years ago when our good customer Jenn Hovland told us that’s what she does. But Ralph grows a LOT dahlias this way, and we thought you might like to see what he has to say about it.
After experimenting with a few the year before, Ralph planted all 200 of his dahlias in one-gallon pots in 2016 and 2017. He potted them up indoors so they’d be sprouted and growing before he planted them outside in his Wisconsin garden in early June. Although some never emerged, most grew and bloomed normally.
That fall after the first frost, he writes, “we chopped off the plants with the machete, waited a few days for things to dry up, and lifted the pots. The difference in the physical work is amazing! One poke with the spade – done.”
Ralph says the tubers in the pots grow four different ways:
“Some develop perfectly normal tubers.
“Some pots have no tubers at all, only measly roots – onto the compost pile.
“Some very large tubers grow inside and outside the pot and we chop them off.
“And some have one massive bundle ... [of] tightly wound-up tubers filling the entire pot” which sometimes even “busts the pot to pieces.”
Ralph leaves them all in their pots for winter storage, which means “there’s no washing and no dividing in the traditional sense.”
In spring, he empties the pots, “if only to see how they survived the winter. Maybe 15% shrivel up. Most of the others call for an executive decision: Those with only small tuber bundles go right back into the pot. If there’s a substantial bundle, chop it once or twice” and you’re good to go.
Ralph says you’ll need to have extra pots on hand in the spring because as many as “a third are no longer usable and need to be replaced.” Although you can buy pots at garden centers and online, if you’re a nature-lover and plastics-hater like me you might try fixing them with duct tape or using gallon milk jugs as pots instead.
So doesn’t that sound easy? If you try it, please let us know how it works for you and if you have any additional tips. We always love learning from our customers. (May, 2019)
Protect Your New Plants with Trash-Can Cloches

Here’s a simple tip to protect your newly-planted iris, dahlias, daylilies, and other young plants from rascally rabbits, squirrels, deer, and other pests. It’s from the “Great Ideas from Smart Gardeners” column that’s in every issue of one of our favorite magazines, Garden Gate.
“Anna Ellenberger discovered some great plant protectors at her local dollar store: Wire mesh trash can baskets.
“They’re 10 inches tall and wide and available in either black or white. The size works great for setting upside down over her seedlings and small plants to keep critters from munching their new leaves, and the black color blends into the surroundings better than the white.
“Anna suggests poking small stakes through the mesh to keep the trash can in place. [U-shaped landscape pins work well, too.] When they aren’t in use, they stack up neatly for storage.” (April, 2019)
Natives Not Required, Expert Says, “Just Grow Plants”

As I watched the bees feeding frenziedly on my winter aconites and Crocus tommasinianus this spring – long before any native plants were in bloom – I was reminded of the advice of an eminent British ecologist.
Ken Thompson, who was profiled in Gardens Illustrated last November, has spent most of his long career studying the relationship between gardens and wildlife. He says his work was inspired by Jennifer Owen who, in the course of 30 years spent cataloguing the wildlife in “her ordinary, neat, suburban garden,” found 2,673 species including several which were new to science. As Thompson notes, Owen’s work “showed that you don’t have to create a pretend version of a natural habitat in order to attract wildlife.”
“Gardens aren’t like any natural habitat and because of that people think they are inferior, but they’re not,” he says. “They’re just another kind of habitat. Yes, have a pond if you can, do without chemicals, and leave some piles of dead wood around, but hedges, flowers, and plants all create places to feed and places to rest, and that is all that wildlife needs.”
“My best advice for anyone concerned about wildlife is this,” he says in conclusion – “just grow plants. Creatures eat plants, or the nectar created by plants, and everything else eats the creatures. As long as you are growing plants, you are doing all right.”
So even though native plants are awesome, there’s no need to feel guilty about growing plants that aren’t – and the bees in my garden clearly agree with Thompson about this. (April, 2019)
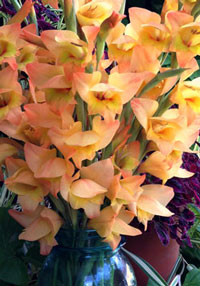
A Head Gardener’s Tips for Growing and Enjoying Glads
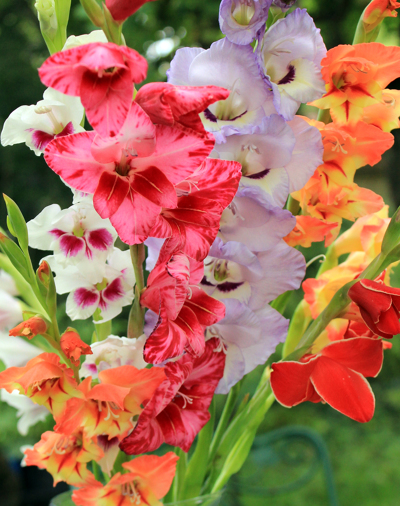
I learned something new recently: “When cutting gladiolus, it is always best to remove the top bud, which often results in more flowers in the stem opening to their full potential.”
So says head gardener Tom Brown of Parham House and Gardens in Sussex. Here’s some other helpful advice he offered in an excellent article in the July 2018 Gardens Illustrated.
“Gladiolus are relatively easy to grow,” Brown writes, “and as the corms are so inexpensive you can afford to use them as annuals, meaning you can experiment with different colors and styles from one year to the next.”
If you don’t want to buy new ones every year, they can also be dug and stored or – depending on your hardiness zone – “mulched heavily in sheltered, free-draining areas” To try that, cut the stalks down after frost, “cover the clump with a plastic bin liner [storage tub] to keep the corms dry, and mulch liberally with compost.”
Although Brown notes that many sources recommend planting glads earlier, he prefers “waiting until at least May” – again depending on your hardiness zone – “when the soil has warmed and the chance of frosts faded.” For a longer bloom season, he recommends “staggering your planting through May and June at fortnightly intervals.”
If you’re growing them for cutting, “you should be able to squeeze 60 to 100 corms into a square meter” which means planting them roughly four inches apart. To grow them intermingled with other flowers, Brown removes “a spade’s width and depth of soil” and then sets “five to seven corms at the base of the hole.”
Brown says that planting corms about ten inches deep gives them “consistent moisture and temperature so the flowers need less staking.” Smaller glads like ‘Atom’, ‘Starface’, and the Abyssinian glad often need no staking, while full-size glads “simply need four stakes in the corners of the clump and then string around the perimeter and a few pieces in between.”
Now doesn’t that sound easy? To give these tips a try and “indulge your garden and your vases with bold and beautiful spikes,” why not order a few glads now for April delivery? (March 2019)
Great Companions to Plant with Your Iris this Spring
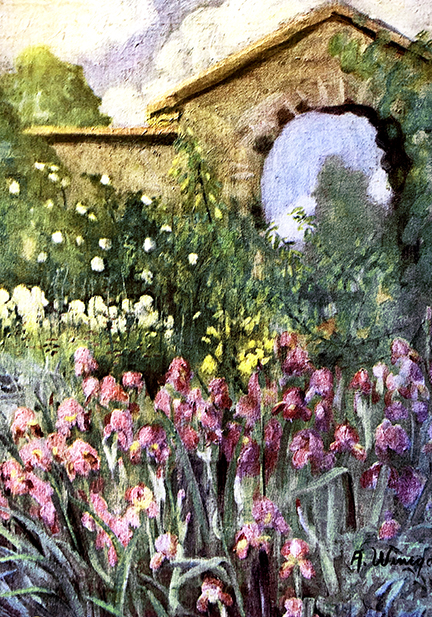
The right companion can make any plant in your garden look better. For bearded iris, here are some tips from two of America’s greatest garden writers.
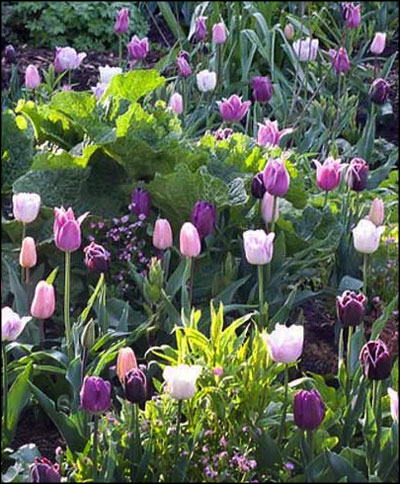
For June borders that are “a joy indeed,” Louise Beebe Wilder in her 1927 book My Garden recommends intermingling iris (as in this painting from another of her books) with “tall blue and white lupines, lemon lilies [Hemerocallis flava], foxgloves, and peach-leaved campanulas, with a background of Persian lilacs and such free-growing roses as ‘Stanwell’s Perpetual’, ‘Madame Plantier’, and the yellow briers – ‘Harisoni’ and the Persian – and edged with double white pinks and Nepeta mussini [catmint].”
John Wister in his 1930 The Iris recommends some of the same plants and adds to the list: “Good garden combinations can be made with a background of Spirea ‘Van Houttei’, Philadelphus coronarius [mock orange], and kerria with lavender iris and salmon pink Oriental poppies. Pink iris [such as our ‘Queen of May’ and ‘Caprice’] go equally well with this. Gypsophila [baby’s-breath] statice, clove pinks, Nepeta mussini [catmint], Anchusa [Italian bugloss], and lupines are but a few of the many plants that gardeners have used successfully with various irises.”
With their smaller flowers and rugged constitutions, heirloom iris often combine more harmoniously in gardens than modern cultivars do. We’re shipping a dozen of the best for planting in April, and now is the time to order! (March 2019)
Dahlia Tips from Longwood Gardens
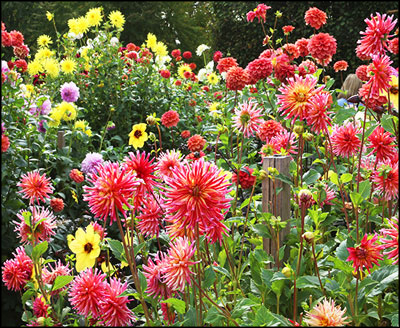
Fall is dahlia season, and the parking lot at Longwood Gardens was overflowing recently as thousands of visitors thronged to the national show of the American Dahlia Society.
Longwood is one of the country’s grandest public gardens, and dahlias have been grown there ever since it was the private home of Pierre S. du Pont. Between 1909 and 1934 du Pont purchased “around 500 batches of dahlia tubers,” according to the Longwood archives, probably for planting in his 600-foot Flower Garden Walk where they’re still grown today in a sumptuous mix of annuals, perennials, and grasses.
In a recent interview with blogger Margaret Roach, Longwood horticulturist Roger Davis shares his tips for growing and (if you want to) storing dahlias. Two of the three varieties they discuss are heirlooms – dark-leaved ‘Bishop of Llandaff’ and creamy ‘Café au Lait’ – and fellow oldie ‘Thomas Edison’ is also blooming gloriously at Longwood this fall.
Read the complete interview here, and if it leaves you feeling inspired, here’s a tip from us – you can order your own dahlias now for delivery at planting time next spring. (October 2018)
The Best Water for Your Garden – in 1686
Water is an essential part of life – especially the life of gardeners. If you spent too much time this past summer dragging the hose around like we did, this excerpt from John Evelyn’s 1686 Directions for the Gardener at Says Court is for you.
“The best water,” Evelyn wrote, “is from rivers and running streams [rather than from a well or spring] so it be not too lean and cold.
“That which is always standing or shaded corrupts and is not good, but the water of ponds, and wherein cattle soil, is excellent, [and] rain water has no fellow.
“If water be too thin and poor, enrich it with the dung of sheep or pigeons by hanging a basket full of it into the water and letting it steep. Cow dung is also profitable. [However] water over-dunged brings a black smut on orange leaves, etc.
“If you be necessitated to use cold raw spring water, let it stand a while in the sun, and therefore keep always ready an infusing tub or vessel. Four gallons of heated water qualifies 20 gallons to milk-warm.”
Who knew water could be so complicated, eh? But as you may have already discovered – and Evelyn’s gardener probably wanted to tell him – you don’t have to do everything perfectly to have a wonderful garden. Hopefully yours made it through the summer just fine, even if you didn’t water it with milk-warm, dung-enriched river water. (Sept. 2018)
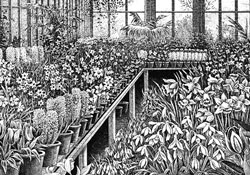
Multiplying Hyacinths in 1896 and Today

Daffodils, tulips, and most other bulbs multiply naturally underground by producing offsets or daughter bulbs. Roman hyacinths do, too, but – after centuries of breeding – traditional garden hyacinths reproduce so slowly this way that bulb growers long ago developed ways to speed up the process. The techniques described below by Liberty Hyde Bailey in his 1896 Nursery Manual would have been familiar to bulb-growers a century earlier and are still standard practice in the Netherlands today.
Bailey starts by explaining that “bulbels are often produced by an injury to the bulb. Growth of stem and leaves is more or less checked and the energy is directed to the formation of minute bulbs.” It’s the bulb’s natural reaction to injury that growers take advantage of in multiplying hyacinths.
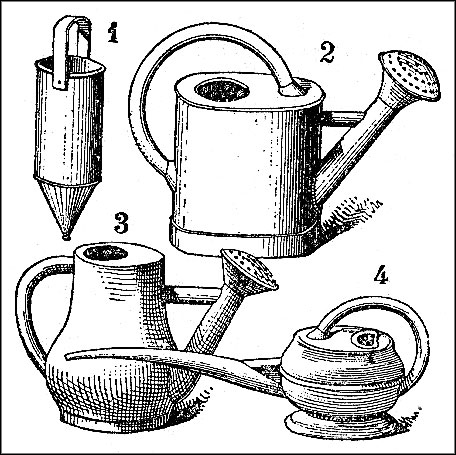
“The favorite method is to make two or three deep transverse cuts into the base of the bulb [image 1]. The strongest bulbs should be chosen, and the operation is performed in spring or early summer, when the bulb is taken up.”
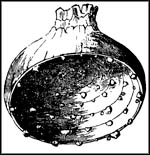
In another method, “the bulbs are hollowed out from the underside for half or more of their depth [image 2]. This operation is sometimes performed later in the season than the other, and precaution should be exercised that the bulbs do not become too moist, else they will rot. . . .
“The mutilated bulbs are stored during summer, and are planted in fall or spring. The wounded bulbs produce very little foliage, but at the end of the first season the bulbels will have formed. The bulbels are then separated and planted by themselves in prepared beds.
“Several years are required for the bulbels to mature into flowering bulbs. Some of the strongest ones may produce flowering bulbs in three years, but some of them, especially those obtained from the hollowed bulbs, will not mature short of six years.”
Could you do this at home? Of course – and now’s the time for it. If you do, please share your story (and photos) with us. Good luck, and have fun! (June 2018)
Perennial Companions for Tulips – and ‘Thalia’
Although “tulips on their own can look spectacular,” writes UK garden designer Kristy Ramage in the April 2017 Gardens Illustrated, “I prefer to grow them more sparsely in combination with perennials, where the emerging leaves and a few early flowers are a foil for the shapely heads of the tulips.”
Kristy especially likes growing tulips “through mounds of soft foliage” such as that of columbines, meadow-rue (Thalictrum), Jacob’s ladder (Polemonium), hardy geraniums, and Anthriscus sylvestris ‘Ravenswing’, “a variety of wild chervil whose “ferny, copper-colored foliage . . . tones with the dark tulips and sets off the light tulips beautifully.” (Sadly for us here in zone-6a Ann Arbor, ‘Ravenswing’ is hardy to zone 7 and warmer only.)
She also highly recommends three of our favorite heirlooms for planting with perennials:
‘Apricot Beauty’ tulip – “Named in 1953, this lightly scented, softest salmon-rose tulip is vintage in more ways than one – imagine silk lingerie from the 1920s and you have this Single Early tulip to a tee.”
‘Columbine’ tulip – “Exquisite and rare, a ‘broken’ tulip of the type that was prized by the English florists’ societies of the early 19th century. It opens to a wide cup, displaying black anthers inside.”
‘Thalia’ daffodil – “I wouldn’t be without ‘Thalia’ somewhere in a garden. The form and color of this daffodil is so good it’s impossible not to be charmed. Introduced in 1916, it has been deservedly popular ever since for inter-planting with other bulbs or planting in drifts in a woodland.”
This spring, before your perennials reach their full-size, why not mark a few spots where a handful of tulips or ‘Thalia’ would look fabulous next spring– and then order now to make sure you’ll get them! (May 2018)
Rita’s Easy Way to Get Your Dahlias Eyed Up and Sprouting
You don’t have to start your dahlias indoors, but it can be fun – and reassuring if you’re new to dahlias. Here’s how our long-time office manager Rita Bailey does it.
First of all, if you don’t see any eyes on your tubers when they arrive, don’t worry. This is perfectly normal. And if you do see eyes, you can skip right to step 4.
1. Start a month or even six weeks before your area’s last frost date. Find yours by zip code at almanac.com/gardening/frostdates.
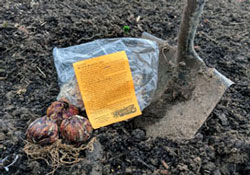
2. For each tuber you’ll need some potting soil, a zip-lock bag, and a clear plastic deli container. Any size is okay as long as the tuber fits, Rita says, since it won’t spend much time in either.
3. Put some potting soil that’s moist but not soggy in the bag, lay your tuber on it, and close the bag most of the way. Set it someplace warm (room temperature is fine) and bright (but not in direct sun), and keep an eye on it.
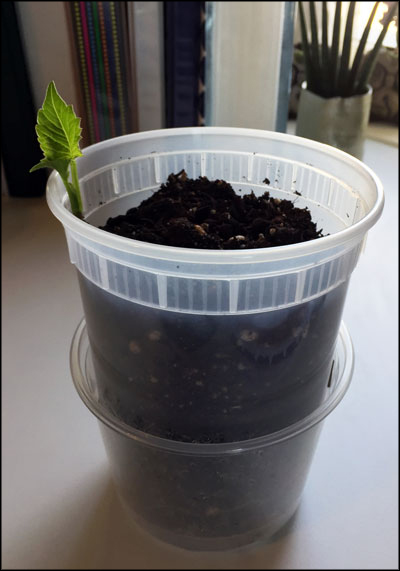
4. Within a week or two you’ll see eyes – little purplish or pale bumps like the eyes of a potato – emerging from the crown just below the old stem. Poke a drainage hole in the bottom of the deli container, fill it with damp potting soil, set it on a saucer (or in a shorter deli container, as in the photo), and plant your eyed-up tuber with the crown covered by about an inch of soil.
5. Keep it warm. Within a week or so, small white roots will begin to show at the sides of the container. Enjoy that sign of progress as you wait for the first sprout to emerge above the soil which, according to Rita, sometimes takes as long as two more weeks.
6. Once you see a sprout, give it as much light as possible and gently shake the container once or twice day to help strengthen the new growth.
7. As your last-frost date approaches, get your dahlia acclimated to outdoor conditions by hardening it off. This means setting it outside for a short period of time every day. Start with an hour or so in a sheltered spot and gradually increase the time and exposure until your plant is tough enough to spend all day in full sun.
8. When it’s hardened off and the last-frost date is past, gently remove it from the container and plant it outside, burying the tuber a little deeper than it was in the container. Water it well and enjoy! (April 2018)
Garden Record-Keeping: Nancy’s ProClick Solution
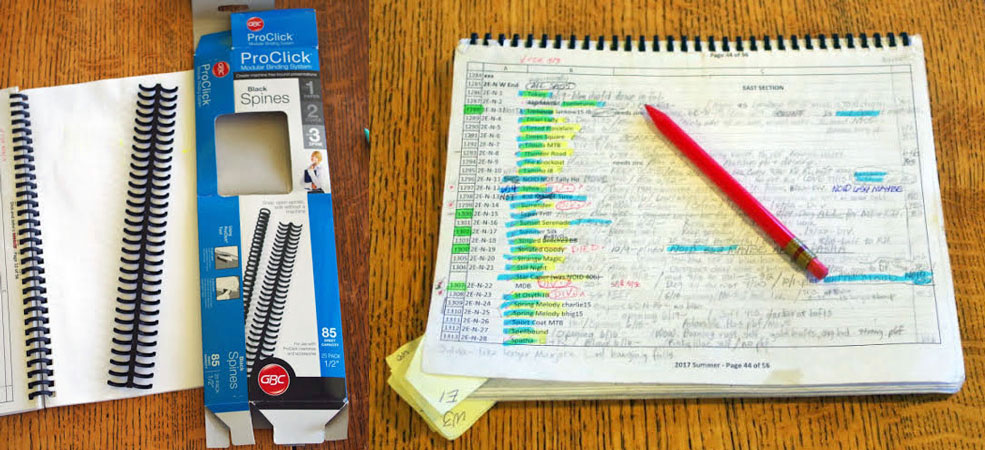
Although keeping notes on your plants – their names, how to take care of them, when they bloom, and so on – can be helpful and even fun, it can quickly turn into a challenging mess.
But here’s a great tip from our good friend Nancy McDonald, as reported by Cathy Egerer in the Dec. 2017 e-newsletter of the Historic Iris Preservation Society.
Nancy, believe it or not, “has about 1750 irises in her care. She keeps them in a master Excel file on her computer, and brings printouts of the file to the garden where she can make notes.
“‘I needed something that would stand up to the wind, and sheets simply tore right out of a three-ring binder,’ she explains. ‘Clipboards were unwieldy and the wind would catch papers and tear them off. Then I found a system called Pro-Click, which allows me to print right on perforated sheets and bind them myself. The sheets flip 360 degrees and I can easily open the bindings to add and remove sheets, and the paper doesn’t tear out of the binding. I haven’t chased a paper across the field since I started using it.’
“ProClick supplies are readily available online and at office suppliers. A pre-packaged presentation kit comes with 50 sheets of perforated paper, two clear front covers, two black back covers, and two reusable spines, all for less than ten dollars.” (Feb. 2018)
How Bulbs Plant Themselves
Nature is amazing, as any gardener knows.
For example, you’ve probably noticed that seed pods can form on your tulips, lilies, and other bulbs if you don’t deadhead them after flowering – but how do those seeds end up as bulbs six or eight inches underground, without a gardener to plant them there?
The answer involves contractile roots, blue light, and – for tulips – the evolutionary pressure of marmots. Canadian blogger Larry Hodgson explains it all at LaidBackGardener.blog/2017/09/20/how-bulbs-plant-themselves/.
One caution, though: In an accompanying article, Larry recommends planting tulips a foot deep and says Darwin Hybrid and Viridiflora tulips often return best – but that’s not been our experience. For our tips on how to get your tulips to return and bloom year after year, visit oldhousegardens.com/HowToFall#Tulipa. (Nov. 2017)
Bulbs in Winter: Tips for Forcing, Tips for Storing
Forcing is fun, and end-of-season bulbs are often deeply discounted at local garden centers – so why not try blooming a few this winter? Some are easy enough for children, while others require more finesse. For inspiration and tips, see our Forcing Bulbs How-To page and our Forcing Bulbs newsletter archives.
Storing tender bulbs like dahlias, glads, and tuberoses is also easy. For our expert advice, see the “Winter Care” sections throughout our spring-planted Planting and Care page. (Nov. 2017)
Peonies and “Pumpkin Spice Latte Gardening”

Pumpkin Spice Latte has returned, and coffee drinkers everywhere are rejoicing.
So why isn’t this wildly popular drink offered year-round, asks Joseph Tychonievich in the current issue of Michigan Gardening. Because then, he says, “we’d drink it, grow tired of it, move on, and forget about it. The fact that this special drink only comes around once a year makes it special.”
And we gardeners can learn from this, Joseph says. “Often in the garden we gravitate to things that bloom or look good for as long as possible,” but “gardens aren’t some math problem. . . . The really important harvest is not flowers or even food, but joy. So maybe it is time to step back a little from all of the long-blooming, forever-performing plants and embrace flowers that . . . instead inspire us with wild joy, anticipation, and glee.”
His top suggestion, we’re happy to say, is peonies – and we’re offering more than ever this fall! Although they don’t bloom forever, “for a few glorious weeks in late May or early June, they’ll positively cover themselves with huge, extravagant, powerfully fragrant flowers.”
“You’ll look forward to that . . . all year long. As the buds swell, you’ll check them each day. When they finally open, you’ll sit next to them drinking in the rich scent. You’ll cut armloads of them. . . . You may even throw a party in their honor.”
Of course “it doesn’t have to be peonies,” Joseph adds. “Find a plant that you truly love, that really thrives and performs in your garden, ignore the fact that it only blooms for a couple weeks in a year, and then plant them by the dozens and revel deeply in the sheer magic of their performance.
“Don’t let anyone tell you they aren’t practical. Gardening is about passion, not practicality. . . . Remember the lesson of the Pumpkin Spice Latte and keep some magic and anticipation in your garden.” (Sept. 2017)
Protect Yourself from Garden Thieves
One of our long-time customers – who asked to remain anonymous – emailed us this sad report after reading our article “The Queen of Garden Antiques” in last month’s newsletter:
“While collecting garden antiques is a wonderful adventure, there is a sad downside. Our garden was burgled last summer with more than 20 garden ornaments taken, many of them antiques.
“Someone had obviously cased the garden and knew what to take. They even went into my greenhouse and potting shed in search of portable items. Alas, I had a photograph of only one of the stolen pieces, taken for a garden tour brochure. Lesson learned. Everything will now be photographed and kept in a file along with all of the receipts, which I do have safely stored.
“Since then I have had a welder bolt some of my smaller urns in place, and though I refuse to consider security cameras, I have hung up signs up that say ‘Smile, you are on camera.’ We keep our six antique iron gates locked, along with the greenhouse and potting shed, and I am like a little old lady walking around with my ring of keys. Not a pleasant way to have to live.
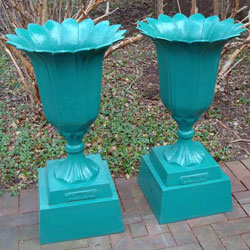
“Forty-plus years of collecting, gone. And I will not be able to – or even want to – start replacing many of these lost treasures. They took a pair of cast-iron tulip urns, for example, that I loved. I saw a similar pair (pictured) offered recently for $4200. Mine were a bit smaller, but when I bought them years ago I probably spent less than $100 each.”
My condolences, friend! And here’s hoping that your heartbreaking story will be a wake-up call for the rest of us. (Aug. 2017)
Extra Easy Growing and Storing Dahlias “In the Dry”
If you haven’t planted all of your dahlias yet, here’s a super-simple way to grow and store them from our good customer Jenn Hovland of Fleur de Louise Flower Studio in Stillwater, Minnesota.
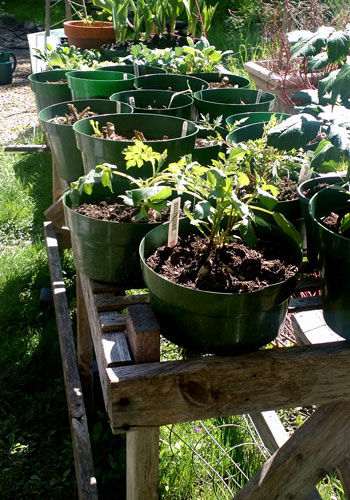
“For several years now I have stored my dahlia tubers ‘in the dry’ as they do in England,” Jenn wrote on her spring order. “I start by planting a new tuber in a 1 or 2 gallon plastic pot. I lay it flat near the top of the pot, cover it with just an inch of soil, water it once, and then leave it alone until sprouts emerge.
“When the weather warms up, I plant it outside, pot and all, pounding a stake into the ground next to it. I always use black or green pots so that even the parts that aren’t buried or hidden by other plants are pretty much invisible.
“At the end of the season when frost blackens the foliage, I wait a few days, lift the entire pot, cut back the dead foliage, let it dry on my porch for a couple of days, and then put it in the basement and forget about it. In March or April when I notice new growth, I move it upstairs to a sunny window and it’s ready for the new season.
“By using this method, I’ve lost very few tubers to rot or drying out. Although it takes a little extra space to store the pots, it has worked very well for me.”
Wanting to know more, I emailed Jenn and she cheerfully answered all of my questions.
One-gallon pots seemed small to me, so I was surprised to learn that she sometimes uses even smaller ones. Pot size doesn’t seem to matter much because, although the tuber-cluster remains confined within the pot, its feeder roots grow through the holes in the bottom. When the pot gets crowded after a couple of years, Jenn divides the cluster and starts all over again.
During the winter she keeps the pots as dark as possible because light encourages sprouting. In March she starts checking for new growth, and when the first sprouts appear – this year in mid-April – she adds an inch of compost to all pots, waters them once, and moves them to a sunny window.
“Then in May,” she told me, “I take the plants outside to harden them off for a couple of weeks, bringing them in at night until they adjust to outdoor living. By mid-May they’ll be staying outside overnight, except when frost is predicted. I finally plant them in the garden around Memorial Day. By then they are quite large plants – which means they’ll bloom earlier.”
That sounds good to me, and I’m planning to give Jenn’s method a try. If you do, too, please let us know your results so we can learn from you as well! (May 2017)
Try This at Home: Multiplying Glads by Dividing the Corm

Even if your glad planting season is still months away, here’s a tip from expert Cliff Hartline that you can use whenever that happy time arrives.
Cliff writes my favorite section of the NAGC journal Glad World. It’s a Q & A column titled “Talk Radio,” and a while ago a reader asked, “I heard you can cut corms in two to multiply them. How do you do that?”
First of all, Cliff replied, it’s important to “make sure there are eyes and root nodes on both halves. The eyes go across the corm in only one direction. They are not like potatoes that have eyes everywhere. Peel the husk off before cutting, so you can identify the line of eyes.” Look for small, individual flaps of shiny husk that protect the eyes, or the emerging tips themselves.
Don’t do this too early, though. “Without the husk, the corm will dry out quicker, so you need to do this close to the time of planting.”
“After cutting it, put powdered sulfur [available at garden centers or online] on the open wound. This helps seal the scar and protect the corm when it is planted.”
Before going on to cut another corm, sterilize your knife with alcohol.
If you’re feeling lucky, “you can even cut the corm into three or four pieces,” Cliff says, although “this increases the chance that it may not survive.” Even if you only cut it in half, there’s some risk involved, so we recommend you try it with inexpensive glads first (although not Abyssinian glads).
Good luck, have fun, and please let us know how it goes! (March, 2017)
Limber Up for Gardening with a Few Easy Exercises

We’ve all been there. It’s the first beautiful Saturday of spring, you’ve spent hours blissfully working in the garden – and the next morning you’re sore all over and hoping you haven’t seriously injured yourself.
But it doesn’t have to be that way. Whether you’re heading out to the garden after a long winter off or just a long week at work, you can protect your body from pain and worse by doing a few easy exercises ahead of time. (March 2017)
February Tips: Stored Bulbs, Forced Bulbs, and Getting Ready

Even if your garden is buried in snow, here are some helpful tips for now or soon:
Check on Stored Bulbs – If you stored any tender bulbs last fall, it’s important to check on them periodically. Problems discovered early can often be remedied, but if you ignore them until planting time, everything may be dead. Learn more at “Check Stored Bulbs Now.”
Don’t Skimp on Chilling – If your forced bulbs try to bloom before the stem has lengthened, it’s most likely they haven’t had enough chill-time at 48 degrees or less. Returning them to cold storage now could help. Learn more at our Forcing Bulbs page.
Loosen Matted Leaves – Small, early bulbs often emerge much earlier than seems possible, especially in warm micro-climates. Matted leaves and winter mulch can hamper their growth, so get out there early and gently loosen or remove it.
Fertilize Before They Emerge – Although it’s always best to be guided by a soil test, if you haven’t fertilized in a while, you may want to do so this spring. It’s easier and safer if you scratch it into the surface before bulb foliage emerges. Learn more at “Fertilize Early.”
Get Ready – Check your garden tools and supplies now, before the mad rush of spring. Buy more fertilizer, twine, stakes, potting soil, animal repellant, gloves – and what else will you need? Be sure you know where all of your tools are, and maybe even treat yourself to a new one.
Order More Bulbs – Of course! See all of our treasures at OldHouseGardens.com. (Feb. 2017)
Fall Tips: Multiplying Glads & Dahlias, Storing without Digging, Etc.

With warmer-than-usual weather in much of the country, it‘s still a great time to do some of the little things that will pay big dividends in your garden‘s health and beauty next year.
Click these links for helpful tips from our newsletter and website:
how to do a simple fall clean-up to prevent iris borers and eliminate peony mildew,
how to get free bulbs by digging and storing your glads (later is better), dahlias, and crocosmia,
how to store – even without digging! – tuberoses, rain lilies, and crinums,
how to safely plant spring-blooming bulbs in outdoor pots,
how to force bulbs indoors for winter bloom – just add water!
For even more bulb care tips, check out the 47 other links at our complete Planting and Care page. Your garden will thank you! (Nov. 2016)
Can Landscape Cloth Turn ALL Glads into Perennials?
Here in zone-6a Michigan we leave our Byzantine, ‘Boone’ (pictured), and ‘Carolina Primrose’ glads in the ground every winter and they come back and bloom the next year just like any other perennial.
But wouldn’t it be great if ALL glads were that hardy? A recent article in the NAGC journal Glad World makes me think that might just be possible.
In his always excellent “Talk Radio” column, Cliff Hartline says that glad grower Bert Blanton “is noted for NOT digging his glads yearly,” even though he lives in zone-6b Missouri. Bert used to protect his glads in winter with a thick mulch of straw, but he says it “always blew around and I was constantly replacing it.”
So three years ago he tried landscape cloth instead, and it worked so well that he’s been using it ever since.
“I plant my rows six feet apart,” he says, “and cover my aisles and rows with landscape cloth, putting the seams right over the rows.” He pegs it down with wire landscape-cloth pins (also called sod staples), and then rolls it back in the spring.
The only problem? After three years of no digging, “I now have jillions of flowers,” Bert says. “I have about 20 spikes to a foot, and the rows have expanded themselves to 15 inches wide. I am getting so many spikes, it is more than I can sell at the Farmers Market or give away. My spikes are larger than anyone else’s, so I sell them for $2.00 each.”
We’re going to experiment with Bert’s technique this winter, even though our gardens are half a zone colder than his. If you try it, too, please let us know how it works for you and we’ll share our results here. (Oct. 2016)
Perennializing vs. Naturalizing: What’s the Difference?
Although the words “naturalize” and “perennialize” are often used interchangeably, their meanings aren’t exactly the same – and it can make a big difference in the garden.
“Perennialize” means the bulbs will behave like perennials, coming back year after year and multiplying under-ground. “Naturalize,” on the other hand, means the bulbs will also multiply by seed, with little or no care, and as a result they usually spread further and faster.
“The experience of one of my neighbors with Siberian squill helped me understand the difference,” wrote Karen Bussolini in the September 2013 issue of The American Gardener.
“For many years, the neighbor divided and replanted clumps of the tiny bulbs in the lawn, trying to create a blooming blue spring carpet. They spread slowly, producing a mass more akin to a bath mat than a carpet, despite having everything they needed – winter cold, good drainage, and dry conditions during dormancy.
“It turns out,” she concluded, “that what they lacked in order to naturalize was enough time for the seed to ripen. Once the family began mowing the lawn later in the season, they seeded abundantly.”
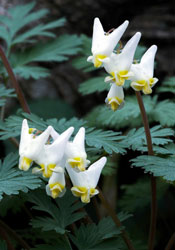
Almost any bulb can set seed, but here are the heirlooms we offer that will naturalize most readily – if they’re in the right spot with the right conditions: tommies (Crocus tommasiniaus), ‘Roseus’ crocus, Roman hyacinths, ‘Early Louisiana’ jonquil, coral lily, tiger lily (by stem bulblets rather than by seeds), rain lilies, and a whole slew of our fall-planted diverse bulbs: purple-headed garlic, Grecian windflower, Turkish glory-of-the-snow, Dutchman’s breeches, winter aconite, antique freesia, snake’s-head fritillary, snowdrops, Spanish bluebell, Southern grape hyacinth, silver bells, Siberian squill, and sternbergia.
If you’ve had success with other heirloom bulbs naturalizing happily by seed in your garden, please let us know and we’ll share the good news here with our readers. (July 2016)
Save the Bees – In Your Own Backyard, Neighborhood, and City
Just in time for National Pollinator Week, June 20-26, our bee-keeping neighbor and friend Eileen Dickinson knocked on our door asking, “Will you sign a pledge to make your yard pollinator-safe?”

Eileen – whose garden was featured in Country Gardens last year – explained that the Bee Safe Neighborhoods pledge offers various levels of commitment. The first and most important is to stop using any lawn or garden product that contains neonicotinoids – which are especially harmful to bees – or any other systemic herbicide or pesticide, since systemics are absorbed into the plant and poison the pollen and nectar that pollinators collect.
To learn more, visit the Bee Safe Ann Arbor Facebook page which has a lot of useful information about pollinators and gardening more safely, including a link to a “Grow Smart, Grow Safe” list of weed control products ranked from least to most hazardous.
Eileen also shared the good news with me that Ann Arbor has applied for certification as a Bee City USA community. “Launched in 2012, the Bee City USA program endorses a set of commitments for creating sustainable habitats for pollinators, which are vital to feeding the planet,” I learned at the organization’s website. “Communities across America are invited to make these commitments and become certified as a Bee City USA affiliate.”
I signed the Bee Safe pledge, and even if Eileen doesn’t make it to your door, I hope you’ll celebrate National Pollinator Week by pledging to make your yard a safer place for these critically important and vulnerable creatures. (June 2016)
A Few Simple Bulb Tips for June
Dead-Heading Iris and Peonies – Cutting faded blooms redirects your plants’ energy from seed-making to future growth and bloom. Cut down iris bloom-stalks (not individual leaves) as close as possible to the rhizome, but cut back peony bloom-stalks no more than is needed to make the plant look good.
RevdSm.jpg)
Growing Bulbs in Pots – Container gardening is great, but it’s not the same as growing bulbs in the ground. For the best results, see our Bulbs in Pots page.
Multiplying Your Rarest Tulips – In most gardens, the best way to give your rarest tulips the dry summer rest they need is to dig them up after the foliage yellows and store them in a dry, well-ventilated place – maybe hanging in mesh bags from the rafters in your basement or garage. Then put a note on your calendar so you don’t forget to replant them in the fall!
Staking Dahlias – For a bushier plant, pinch out the center shoot after three or four sets of leaves develop. Although dahlias grow upright and may look like they don’t need support, they do. Learn more.
Controlling Red Lily Leaf Beetle – The earlier you find and destroy these pests – which are currently expanding beyond New England – the better. Learn more. (June 2016)
Tips for Making Your Peonies in Bouquets Last Longer
Lush and romantic, peonies are fabulous in bouquets. To get the most out of yours, here are some tips from Dr. Patricia Holloway of the University of Alaska, as quoted by Debra Prinzing in her 2013 Slow Flowers:

“‘Cut peonies during the coolest part of the day. Cut once you see the true color of the flower with one or two petals separating at the top [the “soft marshmallow” stage] – or any time after that. Then the flower will continue to open in your arrangement.’ If you cut prior to this stage the buds either will not open or they will be stunted. Fully-opened blooms can also be harvested, but their vase life is shorter. . . .
“Dr. Holloway also offers this commercial growers’ tip; ‘Once cut, your flowers should be chilled in the refrigerator for at least 24 hours and up to one week before putting them into a vase. That chilling very definitely extends vase life.’ Wrap the peonies in paper towels and lay them flat in the crisper drawer, away from the refrigerator’s other contents.”
We’ll also remind you that for future growth and bloom it’s best to leave as much foliage as possible on the plant. This is especially important during the first two years after planting, and in fact many experts recommend that you cut NO flowers the first year. We know how hard that can be, but your patience will be rewarded. (May 2016)
Fish Tank Gravel and a Cell Phone: Improving Your Spring Garden NOW

Have you ever looked at your spring garden and thought, “That spot needs a pop of color” or “I should plant more daffodils right there” – but then later everything has grown and changed so much that you can’t remember what you were thinking? Here’s a tip that will both help you find those perfect spots again at planting time and help you avoid disturbing any other bulbs that are growing nearby.
Right now, before spring is over and everything has changed, walk your garden with your smart phone or camera and a bag of fish-tank gravel. Snap photos of the areas where you want to add more flowers, and use the gravel – which comes in a variety of water-proof colors, from hot pink to subtle shades like green and brown – to outline the exact planting spots.
Later when you’re ready to order or plant bulbs, look at your photos to remember the places you had in mind and to see what your garden looked like in the spring. Then find the gravel outlines, plant your bulbs with confidence, and simply mix the gravel into the soil where it will virtually disappear.
The only hard part is you have to do it NOW, before spring has gone and faded from your memory – so get out there, and while you’re at it, enjoy your beautiful spring garden! (April 2016)
Learning from You: Dahlias for Drought
Although the West Coast drought has eased a bit, we thought you’d be interested in this success story from our good customer Pat of zone-9bWC San Jose. We can’t guarantee it will work for you, but . . . .
“I grew some of your ‘Bishop of Llandaff’ dahlias last year and found them great for our arid climate. I planted them very deep, maybe a foot down, which is low enough for our clay soil to remain moist with almost no watering, if you can believe it. Maybe once a week.
“I followed the directions at your website and put the tubers at the bottom of the hole and then filled in soil little by little as the leaves emerged, which they did very quickly.
“My tiny garden on the west side of our garage gets a good five to six hours of blazing, direct sun and then light shade later in the afternoon. Since we’re in a valley and not near the ocean, nights are generally cool and dry. [OHG: This is exactly what dahlias love!] The plants wilted on the hottest days but they perked up afterward, as you’d see with tomatoes or potatoes.
“Thank you for letting me ramble on. No one in my family is interested. My neighbors like all the free flowers, though! I give quite a few away.” (April 2016)
Garden Tips for Late Winter and Earliest Spring
Although it may be too late for you lucky souls who garden where spring is already well advanced, here are some tips for those of you in colder zones:
1. Crocus, snowdrops, and other bulbs start to emerge earlier than many gardeners realize, especially in warm spots where the snow melts first. Matted leaves and winter mulch can distort their growth, so get out there EARLY and gently loosen or remove it.
2. Rabbits and other animals love to eat crocus, so you may want to spray leaves and buds with a repellant the moment they emerge. Check to see if you have some on hand before you need it, because the animals won’t wait! Tulips and lilies are two other, later-emerging animal delicacies that you may also want to spray.
3. Very early spring is also one of the best times to scratch a little fertilizer into the soil above your bulbs. If you wait too long, particles tend to get lodged between the leaves at their bases where they can burn the tender new foliage. Early spring is also when bulbs need the fertilizer to fuel their rapid growth and bloom. Don’t overdo it, though, and remember it’s always good to be guided by a soil test.
4. Now is also a good time to wash any pots that you’re planning to use for starting dahlias or growing tuberoses, etc. Finish by sterilizing them for a few minutes in a mix of 10% bleach and water. Later when you’re scrambling to keep up with your burgeoning garden, you’ll be glad you did. (March 2016)
Seasonal Tip: Check on Your Stored Bulbs NOW
If you stored any tender bulbs last fall, it’s important to check on them now. The longer they’ve been in storage, and the closer it gets to spring, the more vulnerable stored bulbs are.
KEEP THEM COOL – It’s often hard to keep storage temperatures down as the weather outside warms up. Colder temps are usually better for stored bulbs – just like the refrigerator is better for storing most vegetables – though you never want them to freeze. Warmer temps can lead to premature sprouting and the development of rot, mold, and disease.
Monitor temperatures with a maximum-minimum thermometer. Opening doors or windows in your storage space whenever outdoor temperatures drop may help. Bulbs can also be stored in the refrigerator but remember that the air inside refrigerators is usually VERY dry, so adjust accordingly.
Although most stored bulbs can handle a wider range of temperatures, the ideal for glads and crocosmia is 35-45 F, for dahlias 40-45, and for tuberoses and rain lilies about 50.
ADJUST THE MOISTURE – If storage conditions are too damp – and especially if they’re also warm – bulbs will rot or develop mold, etc. On the other hand, bulbs that are too dry – especially dahlias – may dry out completely.
If you find condensation on the inside of storage bags or boxes, leave them open a bit to let excess moisture evaporate. On the other hand, if your dahlias are shriveling or feel unusually light, sprinkle a little water on them and whatever they’re stored in – coarse vermiculite, wood shavings, peat moss, etc. – and if you don’t already have them stored in plastic, do so. Check back in a few days and adjust as needed.
MAKE A BREEZE – Good air circulation helps prevent disease organisms from developing on bulbs which are stored in mesh bags (glads, crocosmia, and tuberoses). Add a small fan to your storage space, but don’t have it blowing directly on the bulbs, just moving the air around a little.
WATCH FOR SPROUTS – If you’ve stored your bulbs dry in their pots, start checking for new growth long before it’s warm enough to move them outside. A little sprouting is okay, but once it starts to advance, move the pot into your sunniest window and barely water it.
Remember that a pot of tuberoses will usually bloom for a second year if watered and fertilized well, but by the third spring the bulbs will be too crowded to bloom well. Report them then, composting the ones that bloomed previously (since each individual bulb blooms only once) and replanting the largest of the daughter bulbs.
KEEP IT DARK – Light is one of the cues that spurs bulbs into growth, so keeping your storage space as dark as possible will help keep your bulbs happily asleep until it’s time for another year of awesomeness.
Learn more in the Winter Care sections of our Spring-Planted Bulb Care page. (Feb. 2016)
Learning from You: Lilies in the Living Room
Speaking of lilies, here’s an unexpected way to enjoy them up close, from our good customer Kathryn Hubler of Falls Church, Virginia:
“I thought you’d enjoy this photo of the gold-band lilies we received from you last year blooming in our living room. We’ve discovered we like to grow them in pots so we can enjoy their beautiful blooms and scent indoors. A pot of them is now a necessity, so we ordered fresh bulbs from you this year and will rotate the old ones into the garden.
“I grow the lilies outside, protecting the pot in the winter, and then when the first bud opens I bring them inside by our sunny, south facing window. I started doing this by accident one year when I brought the pot indoors to protect the flowers during a big rain storm. They last longer indoors, they’re never damaged by deer, slugs, or earwigs, and their fragrance is divine!”
Two of the most influential gardeners of the 20th century, Gertrude Jekyll and Vita Sackville-West, would probably approve of Kathryn’s technique. Both recommended growing fragrant lilies in pots and then moving them onto the terrace, near doorways, or alongside garden benches when they came into bloom, as they did in their own famous gardens.
Kathryn planted her lilies in the fall which gave them plenty of time to develop a good root system before they had to start growing above ground. Spring-planted lilies may be more of a challenge in pots, but we plan to try gold-band and ‘Uchida’ ourselves this spring, and we’ll let you know how they do.
For tips on growing all sorts of bulbs in containers, see our Bulbs in Pots page. Have fun, and send us your photos! (Dec. 2015)
Learning from California: Gardening with 28% Less Water
Congratulations to our friends in California who, faced with what’s been called the drought of a lifetime, have cut their water use by 28% in the first three months of state-mandated reductions.
In September, my wife and I saw the drought first-hand while visiting our son and daughter-in-law in San Francisco. Plants drooped, dead leaves littered the sidewalks, and lawns in the city’s parks sported signs proclaiming “Brown is the New Green.”
It’s no wonder our orders from California are down 25% this fall! But bulbs, ironically, are built for drought. Many have evolved in areas where summers are so dry that to survive they have to hide out underground. Tulips, hyacinths, alliums, Byzantine glads, freesia, and oxblood lilies, among others, actually do better with dry summers — although they need some water in fall through winter to develop roots and more in spring to grow leaves and bloom.
In August the Pacific Horticulture Society newsletter offered some excellent tips for xeric gardening, by editor (and OHG customer) Lorene Edwards Forkner:
“Recently I read some great, if somewhat blithe, advice from garden writer Amy Stewart on tending a low/no water garden:
“1. Plant drought tolerant plants.
“2. Wait and see what dies.
“3. Plant more of what didn’t die.
“You can read the entire piece at The No-Water California Garden.
Lorene also recommended “Adventures in Growing” about an American woman “creating a fertile landscape in Saudi Arabia and winning the hearts and minds of its caretakers,” this advice from “the great minds at Flora Grubb Gardens,” and Jeff Moore on the “Generosity of Succulents.”
“Then hit those fall sales,” she concluded, “for a dose of colorful, graphic, and resilient plants that take dry weather in stride” — including our fall-planted bulbs! (Oct. 2015)
Seasonal Tips: Fall Bulb Care
Besides planting bulbs, there’s a lot more you can do in the fall to make your garden a healthier and more beautiful place — so here’s some seasonal guidance from our always helpful website:
how to clean up iris and peonies NOW to protect them from borers and mildew,
how to dig and store dahlias, glads, tuberoses, crocosmias, rain lilies, and crinums (but only IF you want to!),
how to plant spring-blooming bulbs in outdoor containers,
how to force bulbs indoors for winter bloom.
For even more, check out the 39 other links at our complete Planting and Care page. Or email or call us. We’re here for you! (Oct. 2015)
Don’t Be Afraid to Kill Our “Rarests” – as Barbara Kingsolver Explains
Every now and then a customer tells us, “Don’t send me any of your ‘Rarest’ bulbs because I’m not a great gardener and I’m afraid I’ll kill them.”
We appreciate that concern, but
(a) even our rarest bulbs are tough and adaptable — they’re survivors, not fragile antiques,
(b) even if they don’t last forever in your garden, when fellow gardeners see them and you talk about how awesome they are, you’re building support for heirlooms, and
(c) as long as people keep buying them, the farmers who grow them for us have a reason to keep growing them.
It’s like heirloom vegetables. As best-selling novelist Barbara Kingsolver explains in Animal, Vegetable, Miracle, “You can’t save the whales by eating whales, but paradoxically, you can help save rare, domesticated foods by eating them. They’re kept alive by gardeners who have a taste for them, and farmers who know they’ll be able to sell them.”
So don’t worry about killing our precious heirlooms. It’s actually pretty hard to do, and even if a couple of them die, you’re still helping to preserve them! (Sept. 2015)
“Easy Arranger” Makes Bouquet-Making Even Easier
Fresh, local, and almost free, bouquets from your own backyard are one of the great pleasures of gardening. And they’re easy — so I admit I was skeptical when Vanessa brought a little wire doohickey called an Easy Arranger into work one day. It’s a grid of woven wire that fits over the top of a vase and holds flowers upright and in place. Once I tried it, though, I was convinced. This thing really does make bouquet-making easier.
It’s all but invisible, too, and relatively cheap. We ordered a set of three different sizes from thegrommet.com for $12 plus $2.20 shipping. You can find look-alikes elsewhere, but the Grommet sells the original by Annabelle Noel Designs, “a firm with a mission to launch innovative household products designed and manufactured by women. Its founder Anne Cork tapped her jewelry-making skills to create Easy Arranger after being inspired by the tape grids she saw florists using to hold their flowers in place.” Check it out here — and happy bouquets! (Sept. 2015)
Heirloom Perennials from Heritage Flower Farm
At Heritage Flower Farm in Mukwonago, Wisconsin, Betty Adelman grows over a thousand varieties of heirloom flowers and ships them to gardeners all across the country. Our friends at The American Gardener magazine profiled Betty recently, and at our request they’ve posted her story online.
Along with heirlooms from Acanthus to Zizia, Betty offers a few pre-planned gardens such as the Emily Dickinson Garden with flowers mentioned in her poetry or pressed in her herbarium. There’s also a fascinating section of “People in Plant History” with short bios of 45 greats from the ancient Greek Dioscorides to Karl Foerster who in 1939 introduced what has become the world’s most popular ornamental grass.
Treat yourself to a look at the Heritage Flower Farm website — and then please consider joining Betty and me as members of the 93-year-old American Horticultural Society, publisher of the always excellent American Gardener magazine. Both are well worth your support. (Sept. 2015)
Daylilies in Bouquets? Definitely!
You might not expect it, but daylilies make fine cut-flowers — or at least our graceful heirloom varieties do. Although an individual flower lasts just one day, buds will continue to develop and open for up to a week indoors.
Way back in 1954, two University of Illinois professors wrote in a USDA booklet that “daylilies have become very popular for home flower arrangements.” They recommended cutting stalks with “several perfect full-blown flowers and a number of well-developed buds,” ideally in the morning when they’re “still fresh and undamaged by wind, sun, or insects.”
“With a little practice, almost anyone can display them to advantage,” the professors continued. “They may be used alone or in combination with other garden flowers and a wide variety of green and dried materials. Delphiniums, gaillardias, gladioli, Japanese iris, Shasta daisies, snapdragons, and zinnias are only a few of the many annuals and perennials that work up nicely with daylilies. Endless combinations can be devised that will brighten up the mantel, party table, or altar. Leaves of caladium, canna, hosta, iris, and peony can be used effectively in place of the natural foliage, as can also the graceful branches of various shrubs and evergreens such as huckleberry, magnolia, rhododendron, and yew, [or] the silvery leaves of artemisia.”
For a little extra inspiration, check out the daylily bouquet we put together yesterday with flowers from our micro-farms and home gardens. And to learn more about using other bulbs in bouquets — from snowdrops to dahlias — visit oldhousegardens.com/BulbsAsCutFlowers . (July 2015)
Bulb Care Tips for June and July
Dealing with YELLOWING FOLIAGE — If you want your spring-blooming bulbs to multiply and bloom again next year, you have to let their foliage continue to photosynthesize until it begins to yellow. Learn more.
Giving Bulbs a DRY REST — Many bulbs — especially tulips and hyacinths — do best in soils that stay relatively dry in summer, so avoid watering them after they go dormant, and don’t overplant them with thirsty annuals.
DIVIDING DAFFODILS — When daffodils get overcrowded, they bloom less. The best time to dig and divide them is when their foliage yellows or shortly afterwards. You can replant them immediately or store until fall.
DEADHEADING PEONIES — After bloom, trim flower-stalks back for a neater appearance, but be sure to leave as much foliage as possible to feed the plant for future increase.
PINCHING DAHLIAS — For a bushier plant, pinch out the center shoot after three or four sets of leaves develop.
Controlling IRIS BORER — The first signs of this pest are leaf edges that look water-soaked or chewed. Poison-free control is relatively simple. Learn more.
DIVIDING IRIS — If you want to divide or move your bearded iris, it’s best to do that during their semi-dormant period four to eight weeks after bloom. Learn more.
Controlling THRIPS ON GLADS — These virtually invisible insects multiply quickly in warm weather and can be devastating. The first step to control is keeping a sharp look out for early signs of damage. Learn more.
Making CUT FLOWERS Last — Picking your own fresh bouquets is one of the joys of gardening! Learn more. (June 2015)
3 Ways to Support Your Big, Beautiful Peonies
Au Naturel – Although we always look for strong stems when we’re evaluating peonies for our catalog, even the strongest stems will bow when their gloriously double flowers are drenched by rain. If you gently shake the water out immediately afterwards, most of the time they’ll stand back up, so most gardeners simply cross their fingers and grow their peonies without support, au naturel.
Cheap and Easy – Although garden centers offer all sorts of wire-ring and linking-stake supports for peonies, most of these are surprisingly pricey. A less expensive option (and what we usually do here at OHG) is to cut a wire-ring tomato tower in half just above one of the rings, so you have two shorter towers. Use the narrower one for newly-planted peonies or smaller perennials, and the wider one for mature peonies. Set it over the plant, pushing the legs securely into the soil. The earlier you do this the better, because once the plant has leafed out you’ll need a helper – or twine – to contain the foliage while you slip the support over it. Leave some stems and foliage outside the support for a more relaxed, natural-looking plant and to hide the wire which is virtually invisible anyway, especially once it rusts.
The Hildene Star – There’s a better, more historic way they use to support the 175 peonies at Hildene, the summer home of President Lincoln’s son in Manchester, Vermont. Basically you insert five short stakes in a circle at the outer edges of the plant, weave twine back and forth to create a star, and then finish by circling the stakes with twine. Hildene’s Andrea Luchini offers complete instructions. Although I can’t imagine doing it for 175 peonies, for a few it’s actually kind of fun. (May 2015)
Celebrate Dirt with the International Year of Soils
Getting your hands in the dirt is one of the great pleasures of gardening (am I right?), and we gardeners understand first-hand the importance of soil. Now you can help spread the word about this critical natural resource by celebrating the International Year of the Soil. The global campaign is built around six key messages that highlight how we all depend on soils:
1. Healthy soils are the basis for healthy food production.
2. Soils provide us with plants we use for feed, fiber, fuel, and medicine.
3. Soils support our planet’s biodiversity, hosting a quarter of the total species.
4. Soils help combat climate change by playing a key role in the carbon cycle.
5. Soils store and filter water, improving our resilience to floods and droughts.
6. Soil is a non-renewable resource and its preservation is essential for a sustainable future.
That last one really gave me pause. A non-renewable resource is defined as one whose “loss and degradation is not recoverable within a human lifespan,” and today 33% of the world’s soil is considered “moderately to highly degraded due to erosion, salinization, compaction, acidification, and chemical pollution.”
To learn more, visit the Soil Science Society of America’s activities page at https://www.soils.org/IYS where you’ll find “I Heart Soil” stickers in a dozen languages including Klingon, recipes for “soil desserts,” educational packets for teachers, and monthly themes such as “Soils are Living.” It’s already given me a whole new appreciation for soil’s importance – and its vulnerability. Save the Soils! (May 2015)
What Was Missing in Your Spring Garden?
Do yourself a favor and walk your garden now, while spring is still fresh in your mind. Where did you need more flowers? And when – early, middle, or late? What flowers did you admire elsewhere this spring that you’d like to see blooming in your own yard next spring?
Take a couple of minutes to jot down a few notes, snap some cell-phone photos, sketch a simple map, or even mark a couple of spots with plant labels, golf tees, or small sticks. At planting time this fall – when spring has faded from your memory and your garden looks so different – you’ll be glad you did.
Even better, why not get a start on your fall order now at LAST year’s prices? Crocus and other little bulbs to scatter about, deer-proof daffodils, fragrant hyacinths, and a rainbow of tulips can all be yours. And you can add to your order anytime before October 1, so there’s no need to wait. Simplify your life, beautify your garden, and save money by ordering NOW! (May 2015)
Planting Tip: Glads Bloom Facing the Most Sunlight, But . . .
We love the way glads add vertical exclamation points of color to the summer garden. To enjoy them the most, though, it pays to site them carefully, as explained in the NAGC’s journal Glad World:
“Glads, like daffodils, tend to face the direction from which they receive the longest period of direct sunlight. While you might expect this to be south, early morning or late afternoon shade from nearby trees or buildings might cause those glads so shaded to face due east or west, or southeast or southwest, depending upon how the shade pattern moves with the sun during the day. . . . Facing is an important consideration since you would like to view the front of the spike from whatever vantage point you usually view the bed, border, or pot.”
Keep that in mind when deciding where to plant your glads, but don’t worry – you can get your glads to bloom facing any direction you want if you (a) plant them in a pot (say, in your vegetable garden) and then (b) when the first florets open, move the pot into your flower garden or onto your front steps and turn it any way you like. To try this trick yourself, why not order a few glads – such as the graceful, fragrant Abyssinian glad or our customers’ favorite ‘Atom’ – for spring-planting? (April 2015)
Seasonal Tip: Fertilize Early, Before Bulb Foliage Emerges
Like all plants, your bulbs will do better when their nutritional needs are met, and that usually means fertilizing them every now and then. Early spring is one good time to do it, before — or as soon as — the foliage emerges. Don’t wait too long, though, or you’ll find it’s hard to keep fertilizer granules from lodging among the emerging leaves where they can burn the tender foliage.
Although it’s always best to be guided by a soil test — and over-fertilizing can cause long-term problems — if you haven’t fertilized in a while, you’re probably safe doing it this spring. A relatively balanced (something like 8-8-8), slow-release fertilizer is best, but anything other than high-nitrogen (the first number) lawn fertilizers will work just fine. Fertilizing can be especially helpful in revitalizing crowded clumps of daffodils that no longer bloom well. (Mar. 2015)
“Like a Hibernating Hedgehog . . . Let Garden Thoughts Rise”
Although winter is rarely a gardener’s favorite season, in A Gentle Plea for Chaos Mirabel Osler encourages us to embrace its enforced stillness:
“When the ice of winter holds the house in its rigid grip, when curtains are drawn early against the vast frozen waste of landscape, almost like a hibernating hedgehog I relish the security of being withdrawn from all that summer ferment that is long since past. Then is the time for reappraisal: to spread out, limp and receptive, and let garden thoughts rise to the surface. They emerge from some deep source of stillness which the very fact of winter has released.” (Jan. 2015)
“Best” Blogger Chats with Scott about Bulbs from Snow to Iris Season
Margaret Roach’s AWayToGarden.com was named “Best Overall Blog” at last year’s first-ever Garden Bloggers conference. If you’re not already a devoted reader, why not take a look at Margaret’s recent talk with me about having bulbs in bloom from snow to iris season. We started with winter aconites (with a great photo of them in Margaret’s garden) and other small, mostly animal-resistant beauties including Turkish glory-of-the-snow (Margaret’s favorite). I did my best to talk her into hyacinths (today’s un-coolest bulb, but awesome), and we touched on fragrant daffodils, tulips, and the very animal-resistant snowflake.
Although it’s not in the written version, if you listen to the podcast of our talk you’ll hear why Margaret says the voles, chipmunks, and rabbits in her garden “never got the memo” about Crocus tommasinianus being animal-resistant. One fall she planted 4000 for a Martha Stewart Living photo shoot but only four survived to bloom in the spring — a painful reminder that animal-resistance ranges from “extremely” to “moderately,” and if they’re hungry enough animals will eat just about anything. (Sept. 2014)
Plant a “Small Extravagance” — “Technicolor Tulips” as Annuals
William Cullina, the highly-regarded author of three books about native plants, is one of the last people you’d expect to hear praising tulips. That’s why we were so pleased to read this recommendation he made in the January 2014 Horticulture magazine:
“After a long, gray winter the burst of Technicolor tulips in our spring gardens provides me the same sensation moviegoers must have experienced in 1939 when Dorothy spiraled down into Oz. Our annual display of tulips at the [Coastal Maine Botanical Gardens] brings throngs of winter-weary families out on warm weekends to soak up the life-giving color, and school groups have begun scheduling their annual trips around the peak display. Though it may seem excessive to some, we purchase tens of thousands of bulbs from Holland each October and plant them in soil recently vacated by frost-slain summer annuals. With a few weeks of gentle weather left, the bulbs quickly sprout a nest of white roots to anchor them against the heaving frosts. Once their blooms have been spent the following spring, we dig them up to make way for summer displays. . . . On a smaller scale at home, even a hundred bulbs can make for an attention-getting display, and . . . this small extravagance will not break the bank.”
Heck, even 10 or 25 tulips can bring a thrilling splash of color to your spring garden. You probably don’t want to try this with our rarest ones, though, so we’ve put together a list of our 19 most affordable tulips here. We hope it inspires you to plant your own little bit of Technicolor magic this fall! (Aug. 2014)
Make Your Bouquets Last Longer with this Simple “Eco-Technique”
In her award-winning book Slow Flowers, Debra Prinzing shows how she created a bouquet every week of the year using only flowers, foliage, twigs, fruit, and seedpods from her yard or grown within a few miles of her Oregon home. Scattered throughout the book are earth-friendly “eco-techniques” for bouquet-making, including this one:
“There’s a proliferation of advice for keeping a bouquet . . . fresh and lasting for many days. But one of the most important things you can do is give stems clean water. . . . My friend Lorene Edwards Forkner shared this easy water-changing trick: Place the entire arrangement in the kitchen sink. Gently lift the foliage at one edge of the vase so the faucet’s spray nozzle is directed inside. Turn on the water and let it flow for a minute or two. The existing water will begin to overflow and go down the drain, displaced by fresh water that now occupies the vase. . . . Do this every day or two for the life of the arrangement.”
For more tips, see our “Bulbs in Bouquets” page — and then go outside and pick some flowers! (July 2014)
Buzzing about Pollinators, June 16-22
The eighth-annual Pollinator Week kicks off on Monday, and we’re hoping gardeners everywhere will join the celebration. As Hunter Stanford writes in the current issue of American Gardener, “Pollinator Week is an opportunity to celebrate pollinators and promote awareness of the important role birds, bees, butterflies, bats, and many other pollinators play in our food supply and maintaining healthy and diverse ecosystems worldwide.” Pollinators account for one out of every three bites of food we eat, and the populations of many of them have declined drastically over the past decade, so one of this year’s goals for Pollinator Week is “teaching people about the causes of pollinator decline and how they can help.” (Learn more at “A World Without Bees,” below.)
One way to help is to garden with pollinator-friendly plants, so I asked our bee-keeping neighbor Eileen Dickinson what bulbs she’d recommend. “Winter aconite and crocus are really important early bulbs,” she emailed me. “I see bees all the time in the Scilla siberica, bringing blue pollen into the hive. Grape hyacinths are good. And of course German garlic.” Eileen also pointed me to the website of Spikenard Farm Honeybee Sanctuary where I found a great page about bee-forage plants which includes “all spring bulbs” on its short list for gardeners with limited space. For a more specific list of bee-friendly bulbs, see the recommendations posted at our Facebook page by our good customer and avid bee-keeper Ron Geer. Thanks Eileen and Ron, and Go Pollinators! (June 2014)
Our Top 10 Bulbs to Plant This Spring for . . .
Hummingbirds — ‘Atom’ glad (runners-up: all of our other glads)
Fragrance — Tuberoses (runners-up: ‘Caprice’ and ‘Pallida Dalmatica’ iris)
Bouquets — ‘Popular Guest’ dahlia (runners-up: our other dahlias and Glorious Glads sampler)
Wildflower Grace — ‘George Davison’ crocosmia (runners-up: Abyssinian glad, Corky’ daylily)
Big Flowers — ‘Kidd’s Climax’ dahlia (runners-up: ‘Surprise’ and ‘Thomas Edison’ dahlias)
Growing in Pots — Tuberoses (runners-up: rain lilies; see our helpful Bulbs in Pots page)
Cool Foliage — ‘Bishop of Llandaff’ dahlia (runner-up: ‘Ehemanii’ canna)
Early Bloom — ‘Gold Dust’ daylily (runners-up: ‘Apricot’ daylily and sold-out (sorry!) ‘Florentina’ iris)
Drought-Resistance — ‘Flavescens’ iris (runners-up: our other iris)
Unique Beauty — ‘Kindly Light’ daylily (runners-up: ‘Ehemanii’ canna, ‘Green Lace’ glad) (late April 2014)
More Praise for the Bulb-Building Power of Stems
Our friend Carl Van Staalduinen’s family has been farming daffodils and other bulbs at their Terra Ceia Farms in North Carolina since the 1940s. After reading last month’s article about the bulb-building value of stems, Carl emailed us with his expert perspective:
“I couldn’t resist replying to your article since we used to cut hundreds of thousands of daffodils for supermarkets in the Northeast. My dad always explained bulb flower production this way: ‘Anything green is doing photosynthesis — the more green, the more sun energy is converted into stored sugar — the more stored sugar, the bigger the bulb — the bigger the bulb, the bigger the bloom.’ Sorry for my punctuation but he always said this in one sentence preceded by an audible, deep breath!
“I like to explain it this way: Think of the green parts of the plant as a solar collector — but the leaves are only two-dimensional while the stems are three-dimensional. In the short time that a daffodil has to recuperate from blooming, make seed and, finally, produce next year’s flower buds, the additional surface area for photosynthesis that the stem provides can make a huge difference in sugar-converting potential. This underscores why it is important to leave stems on the plant if at all possible — and also why dead-heading is a good idea since it reduces ‘energy consumption.’“ (late April 2014)
To Build Up Your Daffodil Bulbs, Does 1 Stem = 4 Leaves?
“Leave those leaves alone” — that’s one of our bulb-growing mantras. But an article in the March 2012 Daffodil Journal explains that, for more bulbs and future blooms, what you do with the stems is also important. Daffodil breeder Peter Ramsay of New Zealand writes:
“My old Dad used to lecture me constantly on the virtue of looking after leaves. He growled at me when I would bend some of the leaves over so that they didn’t rub against flowers. He also favored dead-heading flowers, claiming the stem was worth four times the value of one leaf [and] that letting daffodils go to seed was similar to pregnancy and it could sap energy. . . .
“Last year I posted Dad’s claim on Daffnet . . . . Some of the replies were very interesting. [Irish daffodil breeder] Brian Duncan commented, ‘I’ve long been one to accept that a stem can have a significantly greater effect than a single leaf. I think possible reasons for [this] are: stems are often . . . longer than leaves [and therefore] less shaded; stems are rounded and stand more vertically than leaves, thus being more exposed to sun from sunrise to sunset; and stems usually stay green longer than leaves. . . . .’
“Ted Snazelle, a research scientist, added . . . ‘Deadheading is important. Otherwise a fruit (seed capsule) might develop; fruits are said to be “sinks” for sugar. Thus less sugar would be available to transport down into the bulb and ultimately less sugar for the carbon compounds and energy required to make a new flower.’
“So there we have it — scientific explanations and the observations of one of the world’s best exhibitors support Dad’s views.” (April 2014)
Timeless Advice for the “First Peeping of Ye Spring”
We aren’t the first gardeners to be troubled by weeds. In 1686, the eminent London author John Evelyn wrote a long list of Directions for the Gardiner at Says-Court, and despite modern chemicals and technology his simple advice for controlling weeds is still essential:
“Above all, be carefull not to suffer weedes (especially Nettles, Dandelion, Groundsill, & all downy-plants) to run up to seede; for they will in a moment infect the whole ground: wherefore, whatever work you neglect, ply weeding at the first peeping of ye Spring. Malows, Thistles, Beane-bind, Couch, must be grubb’d up and the ground forked & dilligently pick’d.” (April 2014)
Bulbs in Pots: Our New Page of Tips for Tuberoses, Rain Lilies, and More
Every summer we decorate our front porch with pots of fragrant tuberoses and little pink rain lilies, while out in the back yard we tuck pots of glads in among the perennials to provide exclamation points of color.
You can, too! Most spring-planted bulbs are easy to grow in containers, and you’ll find everything you need to know at our newly expanded “Bulbs in Pots” page. Read it now and get ready for a summer filled with beauty, fragrance, and fun. (March 2014)
Bulbs in Winter: Tips for Forcing, Storing, and Protecting
Now is the best time to protect iris against borers with a simple, poison-free garden clean-up. Learn more at ksre.ksu.edu/news/story/fall_cleanup110410.aspx .
Storing tender bulbs like dahlias, glads, and tuberoses is easy — and frugal. For guidance, see the bulb-by-bulb “Winter Care” sections of our spring-planted Planting and Care page.
And you can enjoy spring in winter by forcing just about any bulb into bloom indoors. For inspiration and tips, see our Forcing Bulbs How-To page and our Forcing Bulbs newsletter archives. (Nov. 2013)
Bulbs for Partial Shade, South and North
In her weekly column in the Greenville [SC] News, Marian St. Clair offers good advice for shade gardeners everywhere — and recommends several of our bulbs that she’s planting this fall.
“Spring-flowering bulbs grow and bloom from energy stored within the bulb the previous year,” Marian explains. “For repeat bloom, gardeners must maintain nutrient-rich and moist soil conditions to nurture the bulb until foliage dies back and the bulb becomes dormant. Of course, this is also the most important time for bulb foliage to receive the maximum amount of sunlight. For success, shade gardeners should select bulbs that flower early, so foliage has time to restore energy to the bulb before trees produce a new crop of leaves.”
For her zone-8, South Carolina garden, Marian writes that she’s “especially excited about a pair of early-blooming daffodils from Old House Gardens. . . . Early Pearl, a tazetta . . . rediscovered in an old garden in our region’s ‘Spanish moss belt,’ [and] Campernelle; a tried-and-true heirloom grown for more than 400 years. . . . This fragrant yellow daffodil looks like a wildflower compared with many of the new, chunkier hybrids . . . and its slightly twisting petals remind me of a child’s pinwheel.” Other shade-tolerant heirlooms from us that she’s planting this fall — all of which are good north through zone 5 as well — include Crocus tommasinianus, “a lavender beauty known as the best crocus for the South,” white Spanish bluebell, giant snowdrop, and Trillium grandiflorum. (late Oct. 2013)
Easy Underground Storage for Dahlias, Glads, Etc.
For our usual advice on storing your dahlias, glads, and other tender bulbs this winter (IF you want to), see the “Winter Care” sections of our Planting and Care page.
But if you want to try something different, here’s a new idea: bury them underground. Although we haven’t tried it, it’s recommended by a gardener we trust: Janet Macunovich, a Detroit-area horticulturist and writer who really knows how to garden. At her website gardenAtoZ.com she writes:
“It’s easy to dig a hole about 24” deep and as wide as needed. . . . Then we put [the bulbs] in the hole and cover them with something like burlap that can let some air and water pass but that slows our shovel so we don’t slice right through our prize when we reclaim it in early spring. Then we backfill the hole and put something like a bag of leaves on top to mark the spot and for extra insulation. We’ve been told we should be burying things 42 inches deep to be down where the soil stays at 40-50 F year round — below the potential frost line. Yet frost rarely gets that deep into the soil in our area. Even though the temperature may drop to -20 F, it doesn’t hold there long enough to drive the ice that far into the ground.”
Every garden is different, though, so if you decide to try Janet’s technique we recommend starting with just a few bulbs to see how well it works in your soil and zone. And please let us know your results! We love learning from our customers. (late Oct. 2013)
10 Tips for Planning a Spring Bulb Garden
In “Ask the Expert: All About Bulbs,” a recent post at Gardenista.com, Michelle Slatalla turned to us for advice on how to plan a small spring bulb garden. She writes:
“In Chicago, where I grew up, tulips were pretty much the only thing that kept us going through the winter. You can survive snow, and you can survive ice, and you can even survive the razor winds that blow in from the lake to rub your face raw, if you know that one day you will look out a window and see a clump of tulips, their swan necks improbably supporting the weight of their fat flowers.
“But it can be daunting, in the autumn, to figure out how precisely to make tulips happen. Which varieties to plant? What about crocuses? In the mild climate of Northern California where I live now, should I plant daffodils instead? And how do I gracefully make room in the garden for flowers that bloom briefly before saddling me with sad, withering foliage that I’m not supposed to cut back for weeks?
“For advice, I phoned bulb grower Scott Kunst of Old House Gardens. . . . ‘I don’t know where to start,’ I said to him. ‘Start small,’ he suggested. Here’s how.” Read more here. (Oct. 2013)
A World Without Bees?
Every gardener knows that bees are important, and you may know they’ve been dying off recently at an alarming rate. But did you know that a third of what we eat every day is bee-dependent? Or that this past winter almost a third of all bee colonies in the US disappeared? And what about neonicotinoids? Have you been using them — or bringing them into your garden on plants you’ve bought? Although I thought I was well-informed, I learned a lot — both about the wonders of bees and the threats facing them today — in a sobering cover article in Time magazine. You can read an excellent short version here and learn more about the dangers of mass-market plants laced with neonicotinoids here. Bees have been working hard for gardeners for thousands of years. Now they need our help, and learning more is the first step. (Sept. 2013)
Buried Treasure: Tips for Fall Planning and Planting
There’s a lot of helpful information at our website, but it’s not always easy to find. Here are six great pages you might have missed that could help you right now:
Daffodils for the South and Warm West,
and the brand new Animals & Other Pests section of our newsletter archives. (Sept. 2013)
Gertrude Jekyll Says Fall is Best Time to Plant with Kids
When I was seven, my dad dug up a few feet of our backyard so I could plant a garden, and an old family photo shows me holding my first two radishes and beaming with pride. Radishes sprout and mature quickly, which is helpful for naturally impatient kids, but since most kids don’t really like to eat radishes, you might want to try this instead:
"Miss Gertrude Jekyll [godmother of the perennial border and one of the most influential gardeners of the 20th century], understood children as well as gardens and wrote a book about both. It was her view that children should be given a garden ready-made, and preferably in autumn. . . . . [They] should be allowed to alter its design to suit themselves, but it should be face-lifted and planted up (with the plants and bulbs of their choice) by the beginning of November. Then they can forget all about it during the cold months until early spring brings the garden — and the children — to renewed, crocus-bright life." (By Michael Hyde in the UK Guardian, collected by Ruth Petrie in Notes from the Garden.)
For one of the easiest ways to garden with kids in the fall, see our good customer Debra Anker’s simple instructions for planting a crocus-filled "bulb cake." And have fun! (Sept. 2013)
A Whole Page of Help: Growing Bulbs in Pots Outdoors
Container gardening is increasingly popular, and we’re big fans of it. But you can’t grow bulbs such as daffodils and tulips in containers the same way you’d grow them in the ground. Even the largest container is a tiny, cramped, highly artificial world where the wrong potting soil, extreme temperatures, or a few days without water can spell disaster. If you know what you’re doing, though, it’s easy — and we’re here to help. For step-by-step guidance from choosing the best containers to spring bloom and beyond, check out our new Bulbs in Pots page. (July 2013)
Blasting: Why So Many Good Buds Went Bad This Spring
“Why didn’t my buds open?” That’s a question we heard a lot more than usual this spring. When buds form but fail to develop into flowers it’s called “blasting.” This usually happens because the plant didn’t get what it needed, and first-year plants with immature root systems are most at risk.
Too Little Water — Spring-blooming bulbs such as daffodils and tulips need plenty of water (a) in the fall to grow roots and (b) in the spring to grow leaves and buds that open successfully. If there’s a stretch of dry weather in the fall, initial root growth will be hampered and the bulb may never catch up. The same thing can happen when there’s a stretch of dry weather in spring. Either way, once the rush of spring growth begins above ground, a bulb without plenty of roots may manage to develop foliage and buds, but if it can’t draw up enough water fast enough, those buds will blast.
New Bulbs and Late Planting — Inadequate root development is more often a problem for newly planted bulbs, and even more so for bulbs that are planted late in the fall.
High Temperatures — When spring heats up or temperatures spike, even bulbs with good root systems can struggle to supply their buds with enough water to make up for what’s being lost through transpiration. When they can’t, the buds blast. Late-blooming varieties are most at risk, as well as bulbs planted in hot spots.
Too Little Sun — Sun-loving plants such as marigolds and peonies won’t bloom well in the shade, and the same is true of sun-loving bulbs. If they can’t photosynthesize enough to fully develop their buds, they’ll blast.
Storage Problems — Dormant bulbs should be stored at temperatures above freezing but cooler than 72 degrees or so, and protected from ethylene gas which is contained in automobile exhaust fumes and produced by ripening fruit.
Doubles, Etc. — To develop their many extra petals, double flowers require more moisture and sunlight, which means they blast more easily. Pheasant’s-eye narcissus do, too — and especially double pheasant’s-eyes — because their roots develop slowly and they bloom late when spring is at its warmest.
Solutions — In most cases — and especially for newly planted bulbs — the most important thing you can do is keep your bulbs well watered from early fall, when they start growing new roots, until a couple of weeks before the ground freezes solid (or all winter if it doesn’t), and then again in the spring while they’re busy producing leaves and flowers. If you do that, and Mother Nature is kind, you can expect to have very few blasted buds and lots of beautiful spring flowers. (June 2013)
Save the Monarchs!
Every fall millions of orange and black monarch butterflies migrate hundreds of miles south to a handful of tiny sites mostly in Mexico where they survive the winter by huddling together on trees. In spring they mate, return north, lay eggs, and die — which means no monarch ever makes the trip twice. So how do they find their way? Scientists are still trying figure that out.
Unfortunately the number of monarchs making the trip this past year was the smallest it’s been in twenty years. Experts blame the decline on last year’s unusually warm weather and a dramatic loss of habitat due to genetically modified crops. “In key US states where the butterfly feeds and breeds . . . farmers have planted more than 120 million acres of corn and soybeans genetically modified to resist the herbicide [glyphosate],” The Los Angeles Times reported. “That allows them to use glyphosate to kill milkweed, the monarchs’ essential food.” Learn more.
To help make up for at least a fraction of those 120 million acres lost, you can plant milkweeds and monarch-favored nectar plants in your yard. For guidance, see Sally Roth’s highly-rated Attracting Butterflies & Hummingbirds to Your Backyard and — for just $2.99 — Tony Gomez’s e-book Bring Home the Butterflies Vol. I: How to Attract More Monarchs.
A spectacular 3-D movie about the monarchs’ odyssey, The Flight of the Butterflies, is now showing in 40 IMAX theaters at museums across the country. It’s a “miniature underdog story,” says the Washington Post, that’s “reminiscent of March of the Penguins,” and “a story about the better side of humans, specifically the real people who first wondered where monarchs go in the winter.” Learn more. (May 2013)
Growing Crinums in the North
Crinums such as our fragrant, pink-striped milk-and-wine lily are fabulous in Southern and warm West gardens, but what if you live in a colder zone? Although they’re not the easiest bulbs to grow in pots — partly because they keep getting bigger and bigger every year — plenty of our customers are doing it and enjoying the results. As for what to do with them in the winter, here are some tips from two New England enthusiasts:
From zone-7a Falmouth, Massachusetts, our good customer Alison Arrouet writes: “I have two crinums that I winter over in my exercise room with my agapanthus and fuchsias. I water them once a month and then in mid-February start watering and fertilizing regularly. They never lose their leaves, they just hang in there, and of course they love being pot-bound. They bloom here in late summer and fall, and their fragrance is marvelous.”
Further north in zone-5a Brattleboro, Vermont, our good customer Mary Lou Buchanan writes: “After the first frost, I place them in my cellar which stays about 40 degrees F. I do not do anything with them while they are down there. About mid April I bring them upstairs into warmth and gradually expose them to more light. I trim off dead leaves and, if there is room in the pot, I add a little fresh potting soil with a spoonful of slow release fertilizer. If they have out-grown the pot, I separate and replant them. I keep them in the house until warm enough to place outside, acclimating them gradually. I put them in full sun in my yard all summer. My three bulbs have grown to about twelve now. I tried wintering them over as house plants but found they got pale and floppy. The cellar method works for me.” (April 2013)
Felder’s Tips for Slowing Down, Even in This Busy Season
Do the squirrels enjoy your garden furniture more than you do? Do you sometimes get so busy weeding, staking, and pruning that you forget to stop and smell the tuberoses? If so, you might want to try a little slow gardening. In his 2011 book Slow Gardening: A No Stress Philosophy for All Senses and All Seasons, Felder Rushing takes the principles of the Slow Food movement — which celebrates everything fast food is not — and applies them to gardening. It’s a quirky book from a quirky, iconoclastic guy, but I think Felder is on to something.
“Slow gardening isn’t lazy or passive gardening,” he writes. “It actually involves doing more stuff, but carefully selected to be productive without senseless, repetitive chores. By focusing on seasonal rhythms and local conditions, it helps the gardener get more from the garden. . . . Think ‘long haul’ and take your time. Life has lots of pressures — why include them in the garden?”
Felder offers a long list of suggestions for slowing down. None are earth-shaking, but that’s kind of the point. Here are a few to get you started:
“Spread out your chores; do a little as you go, instead of loading up the weekend.
“Right plant, right place — choose pest-resistant plants well-adapted to your local climate and soils, plant them well, and let them grow without being pushed. . . .
“When practical, use quiet hand tools over noisy power equipment. . . .
“Get personal with your weather — use a rain gauge and outdoor thermometer.
“Take it easy on vacation — visit public botanic gardens, and walk around older neighborhoods to savor what is grown locally by hands-on gardeners.
“Shop at a farmer’s market for in-season, locally-grown produce.
“Grow your own — propagate enough plants for you and for friends or neighbors.
“Ponder the mysteries of the universe, in the microcosm of your own back yard.
“Share relaxing garden techniques and easy, rewarding plants with children.” (April 2013)
Fragrance in the Garden: 10 Easy Ways to Enjoy It More
Much more than a list of fragrant plants, Barbara Pleasant’s online article “Make Scents” offers ten tips for enjoying more fragrance in your garden. We especially liked her tip #4, “Pursue Petal Power,” in which she explains that “flower fragrance can be produced by nectar, stamens, or pistils, but petals are usually the main wellsprings of scent. This is why double peonies such as . . . ‘Festiva Maxima’ often produce more perfume over a longer period of time than single-flowered varieties. Aroma-producing petals often have a waxy or velvety finish that’s caused by the oil in aromatic compounds. When a honeybee moves about on scented petals, oils that rub off on its body are carried back to the hive, which spreads the news to other bees that a plant worthy of repeat visits has been found.” Read it all at the National Home Gardening Club website — and while you’re there check out the free trial membership which includes an issue of their excellent Gardening How-To magazine.
Of course many heirloom bulbs are rich in fragrance, including spring-planted tuberoses. See a complete list of ours by clicking “Fragrant” at our easy Advanced Search page. Then just order, plant, and enjoy! (March 2013)
Get on Trend: Plant Your Own Cutting Garden
Growing your own vegetables may be the hottest current trend in gardening — with spending on it up 20% over the past three years, according to the National Gardening Bureau — but some experts say that growing your own cut-flowers will be the next big thing. Georgeanne Davis first alerted us to this emerging trend in an article for the Rockland, Maine, Free Press. “In the British Isles and Europe,” she wrote, “where they tend to be five years (or more) ahead of the U.S. in gardening trends . . . , sales increases of around 15 percent have been noted in the past 18 months” for all cut-flower seeds. As Sarah Raven explained in the London Telegraph, “Lots of factors, aside from fashion, are pushing this along. Shop-bought flowers are expensive in normal times, but in a recession we feel it more. We are also increasingly anxious about air miles, with so many of our commercial cut flowers air-freighted from Africa and South America — and usually boring varieties at that. Home-grown is so much nicer, in so many ways.”
“If you’d like to be on the cutting edge of the trend,” Georgeanne continues, “set aside a space in an out-of-the-way corner of your yard or along the edge of your vegetable or herb garden for a production or cutting garden. It doesn’t have to be fancy, because its primary purpose will be to provide you with blossoms (it does of course need sun and fertile, well-drained soil, just like any garden bed). Plan to use a mix of perennials and annuals in a mix of colors, heights and textures.” Dahlias and glads are two of the flowers Georgeanne recommends, calling them, “old-fashioned favorites for the cutting garden,” along with “lush full-blown peonies“ (for long-lasting blooms, cut when buds are in the soft-marshmallow stage) and even daylilies (although individual flowers last just one day, if you set the vase in a bright spot, others will continue to open).
To learn more about bulbs as cut-flowers, see our “Bulbs in Bouquets” page. (Jan. 2013)
Extra Bulbs? Jane Says Plant Easy Daffodil Baskets
When our good customer Jane Baldwin of zone-6a Moreland Hills, Ohio, found herself with surplus bulbs late one fall, she improvised an easy solution that ended up delighting her. “A couple of years ago,” she writes, “I got caught by early snow so I planted the last of my daffodils in baskets. It looked fabulous and I highly recommend this to anyone, even if you’re not in the same predicament. In fact, it’s how I’m planting most of the daffs I ordered from you this fall.
“The baskets were just ones I found in the garage here when we moved in. [If you don’t have any in your garage, thrift shops often sell them for a dollar or two.] They were nothing fancy, older and seasoned by years of use, approximately 6 inches deep and 1-3 feet across. I put a few inches of good potting soil in them and then planted the bulbs right smack against one another with their tips just barely covered by the soil. Smaller-flowered varieties such as ‘Thalia’ went in the smaller baskets and bigger ones such as ‘Carlton’ in the bigger baskets.
“I put them in our attached, unheated garage so they would get the necessary cold and watered them at first, but eventually the soil froze. At the end of winter when it started to thaw, I brought the baskets out on the patio to a sunny spot where they bloomed to perfection. Even though there was only 2-3 inches of soil under the bulbs and they were planted right next to each other, they performed just fine and looked exquisite in the baskets for a good long time out there. It was really very easy, and even our chipmunks and squirrels left them alone.
“At the end of spring I took the bulbs out of the baskets and kept them dry over the summer in the garage. Now they are planted on a hillside along my driveway where they continue to bloom beautifully — and every fall I plant more in baskets.” (Nov. 2012)
Weaving Baskets from Iris Leaves
Right now is the best time to protect your heirloom iris from borers with a simple garden clean-up. It’s easy, organic, and as a bonus you can use the leaves you remove to make some very interesting baskets.
In the fall, iris borer moths lay their eggs on iris leaves and anything similar that’s close by. In the spring, the eggs hatch into tiny grubs that chew their way down into the rhizomes and wreak havoc. So the trick is to eliminate the eggs in the fall. To do this, simply wait until after a good hard frost (which kills the adult moths) and then (a) cut back all iris leaves to a couple of inches and (b) remove all dead leaves and stalks as well as any debris and mulch that’s near the plants. To be safe, don’t compost this stuff. Burn it or throw it out with the garbage — or save the best leaves to make into baskets.
Although we’ve never looked at the browning, beat-up leaves of our iris and thought, “Hey, those would be great for basket-making,” our good customer Frances Garrison makes it look easy and appealing in her FaireGarden blog. If you decide to try it, please send us a photo of your results and we’ll share it with our readers — and no matter how your basket turns out, we promise not to laugh. (Nov. 2012)
A World-Class Garden Library and PlantInfo.umn.edu
Although relatively unknown, the Andersen Horticultural Library of the University of Minnesota (see article above) is one of the country’s richest resources for gardeners. Its collection of seed and nursery catalogs is especially impressive, with nearly 60,000 catalogs dating from 2012 all the way back to 1828. (If you’ve ever tried to buy an antique catalog on eBay, there’s a good chance you’ve been outbid by the library — as we well know!) The Andersen also holds 20,000 books (including rare herbals and works by Linnaeus, Redoute, and Repton) and 300 periodicals (including two centuries of Curtis’s Botanical Magazine), all housed in a beautiful building with furnishings by George Nakashima and windows overlooking the grounds of the Minnesota Landscape Arboretum.
Even gardeners who can’t visit the library can use its award-winning Plant Information Online to search for articles, links, and North American sources for close to 100,000 garden plants. A search for Narcissus, for example, returns a list of 1092 daffodils with at least one source for each. (We’re proud to be the only source for 19 of these daffodils, plus six new to our catalog this fall and our Web-Only Rarests). For gardeners searching for hard-to-find plants, plantinfo.umn.edu is an invaluable aid. (Sept. 2012)
Combining Bulbs with Daylilies, Peonies, and Other Perennials
Mass plantings of tulips or daffodils can be thrilling — be they at Keukenhof or your local mall — but at home few of us plant our bulbs like that. In A Patchwork Garden (1990), Sydney Eddison offers some good advice for integrating bulbs into mixed plantings:
“One of the most valuable lessons I learned from studying the Gills’ spring garden was that by combining bulbs with even a few early-flowering perennials you can have a wonderful display without sacrificing too much precious space. Their use of tulips was particularly striking. Planting them in masses of one color had tremendous impact. The tulips bloomed at the same time as a wealth of herbaceous plants: amsonia, early bearded irises, Iris tectorum, Iris lactea, trollius, nepeta, and the many [hardy] geraniums that Helen grew. Later, their ripening foliage . . . was hidden by their perennial partners and by the emerging foliage of later-blooming perennials. . . .”
“In the Gills’ enormous borders, there was room for a great variety of herbaceous plants. As I didn’t have that much space, I adopted the idea of pairing bulbs and perennials with a different and much more limited selection of plants. I began planting tall [Single Late] tulips — cream to white only — in the middle and at the back of the border, always behind or in association with a clump of daylilies or a peony, to provide cover later for the bulbs’ dying foliage. In addition to hiding the ripening tulip leaves, the foliage of the perennials provides an attractive filler among the flowering bulbs. The daylily leaves are fresh and green and the immature peony foliage is dark green to deep red.” (August 2012)
Getting Old Daffodils to Bloom Again: “Separation Did the Trick!”
In many parts of the country, daffodils bloom every spring in ditches, cow pastures, vacant lots, and other neglected areas where long-forgotten homes once stood. Dig a clump and you’ll often find a crowded mass of small, under-nourished bulbs with only a few that have managed to size up enough to bloom. In your own garden, the same thing can happen to long-established clumps, and the remedies in both cases are the same: fertilize, provide more sunlight, and when all else fails, dig and divide — as our friend Les Turner discovered:
“I found clumps of daffodil foliage in the thick woods near one of the rivers in eastern North Carolina that was home to early settlers in the 1600s. Maybe one or two flowers in each clump. With your help we determined they were ‘Van Sion’ and ‘Twin Sisters’. My wife and I moved the bulbs out of the woods and replanted the clumps on our property near the river with more sunlight. For the next two years, we got about the same results as in the forest, one or two flowers per clump. So we decided to separate the bulbs to get more flowers. We planted one bulb every six inches and this year we had hundreds of flowers and they look very healthy and beautiful. Separation did the trick!” (April 2012)
Made in Michigan: Save 15% on Cool Ergonomic Garden Tools
Although it’s hard to prove a direct correlation, our home state’s battered economy has continued to improve ever since we started introducing you to some of our favorite Michigan-made products. To thank you — and to encourage even more “micro-investment” in Michigan’s rebirth — we’ve teamed up with our neighbors at Radius Garden Tools to offer you a special 15% discount.
Radius’s promise to make gardening easier on my body wasn’t what first drew me to their tools. I just thought they looked cool, cool enough to belong in the Museum of Modern Art. Their hand tools came first, with dramatically arched handles that reduce wrist strain while making them look like they were meant for gardening on the moon. They now offer equally distinctive shovels, rakes, pruners, and other tools, all scientifically designed to help you “Garden more; hurt less.” They’ve expanded their color choices, too, from spring-green to a jewel-box palette of pink, purple, yellow, orange, and turquoise.
One of my favorite tools is the Radius Transplanter, a narrow trowel of brushed aluminum that’s light but strong — and did I mention cool? It’s also a great deal at $9.99, and an even better deal with your 15% “Friends of Old House Gardens” discount. To claim this special discount, simply enter OHG as the “coupon code” on the Payment Information page of the Radius order form. For Mother’s Day or your own garden toolbox, we hope you’ll give our friends at Radius a try! (April 2012)
No Digging Required — Just “Top Plant” Your Tulips
Although planting bulbs is great exercise, if you’re looking for an easier way to do it, Cornell’s Flower Bulb Research Program has a new idea: “top planting” your tulips. As horticulture professor Bill Miller explains, “In our trials in Ithaca, N.Y. — a very cold-winter climate — we found very good results from shallow roto-tilling of a planting area, placing the bulbs on the soil, then covering with 2 to 4 inches of good mulch.” Not only did every tulip bloom the first spring, the bulbs produced even more flowers the next two years. The researchers used “double-ground bark mulch” but Miller says “any good garden mulch should work equally well.” Another important factor in the tulips’ success was that the planting areas were left bare and received NO watering through the summer. Although most gardeners will have a tough time replicating those conditions at home — to say nothing of the challenges of roto-tilling among established plantings — we’re intrigued enough that we’re going to try adapting the technique in our own garden. If you’re inspired to try it, too, please keep us posted. Who knows, top-planting may be the wave of the future! Learn more here. (Oct. 2011)
Albuquerque Gardeners Get Paid to Save Water by Planting Bulbs
In an October 3 article titled “Droughtbusters,” TIME magazine spotlights five innovative efforts to conserve that increasingly rare resource, water. Along with mandatory rainwater harvesting in India and purifying toilet water for drinking in Namibia, the article explores how Albuquerque, NM, has reduced its per-capita water use by 38% — thanks in part to hyacinths. Yes, hyacinths! “Since 1996,” it reports, “Albuquerque’s water authority has been paying residents $.75 per square foot to rip out their thirsty lawns and replace them with plants that need little water to thrive. To date, some 6 million square feet of turf have been replaced with agave plants, Joshua trees, hyacinths, and other desert-appropriate vegetation in a style known as xeriscaping.”
Although we’ve always recommended keeping hyacinths dry in summer — because, like most bulbs, they’re native to parts of the world where summers are parched — it seemed a stretch to call them “desert-appropriate.” As it turns out, Albuquerque includes hyacinths on a list of twelve bulbs whose water needs are rated either low or medium which therefore qualifies them for the xeriscaping rebate: alliums, blackberry lily (Belamcanda), Colchicum, crocus, hyacinths, bearded iris, bulbous iris, surprise lily (Lycoris squamigera), grape hyacinths (Muscari), daffodils, tulips, and rain lilies (Zephyranthes). You can learn more here — or just add “saving water” to the long list of good reasons to plant our bulbs! (Oct. 2011)
How to Make Your Dahlia Bouquets Last Even Longer
Fall is the glory season for dahlias, and hopefully you’re harvesting fistfuls of their beautiful blossoms every few days now. For us they usually last five days or so with no special treatment, but for even longer vase-life see a pro’s advice at our Bulbs as Cut Flowers page. (Sept. 2011)
Our Readers Recommend: Great Garden Nail Brushes
Last month we told you about our favorite brushes for scrubbing dirt-caked fingernails and invited you to tell us about yours. Bob Radtke of Wisconsin shared a tip from his plumber. “He told me to clean my garden fingers by turning on the hose just a little, then spraying my fingertips. All the dirt under your nails gets gently washed away. No need for a nail brush!”
Janet Fisher of Ann Arbor had another frugal recommendation. “This isn’t very classy,” she wrote, “but it works great for me. I just use old toothbrushes. They don’t last very long but they don’t need to — you’re supposed to change your toothbrush every three months.”
Laurel Schreiner of Amherst, NY, took that suggestion a step further. “While nail brushes work on the hands and nail edges, I find an old electric water pic really cleans the cuticles and under the nail itself. My hands are then ready for a manicure and polish.”
“Have I got a nail brush for you!” Pat Stover of Little Rock, AR, emailed us — and when two other readers recommended the same brush, we couldn’t wait to try it. Pat describes it as “perfect, gentle, and extremely effective,” and says that even after years of use “it’s still as good as new.” Sandy O’Rorke of Oregon, IL, and Cindy Brown of Pittsfield, MA, have also used this brush for years. “It’s the best I have found,” Cindy says, “and you can’t beat the price.” It was originally developed as a surgical scrub brush, and versions of it are widely sold as vegetable brushes, but the one Pat, Sandy, and Cindy swear by is sold by Lee Valley Tools. Two of them cost just $1.70, and they come with a money-back guarantee. We’ve been using them for a couple of weeks now, and though Kelly and Josh think they’re great — “the best I’ve ever used,” Josh says — Scott and Vanessa have been less impressed, saying the bristles are too soft to get all the dirt out from under their grubbiest nails. So we can’t guarantee you’ll love it, but it’s definitely worth a try. (Aug. 2011)
Desperately Seeking a Great Garden Nail Brush
If you’re a gardener who loves to get your hands in the dirt, you know how important a good nail brush is — and how hard it can be to find one that can keep your fingernails looking decent and won’t wear out after a month or two. We’ve been disappointed by all sorts of them, including plenty of expensive ones. But here are a couple we’ve been using since last summer that have proven their worth.
Although it’s not pretty (we found it at the Auto Barn, after all), the Eppco Heavy Duty Two-Sided Hand and Nail Brush is, well, dirt cheap at $1.69 each, and its bristles are stiff and long-wearing. We especially like how the angled row of extra-stiff bristles on one side scrubs even the toughest gunk from under our nails. A much more attractive brush that has also given us many months of excellent scrubbing is the Compact Hand and Nail Brush by Fuller Brush. Although its bristles aren’t quite as stiff as the Eppco’s, they scrub well and hold up well. It’s more expensive at $7.99, but it’s worth every penny.
If you’ve found a brush that’s worked well for you over the long haul, please share the good news with us at help@oldhousegardens.com or our new Facebook page. And happy scrubbing! (July 2011)
Try This at Home: Fresh Peonies Months from Now
In the early 1900s, peonies reigned as one of the country’s leading cut-flowers, in part because they can be stored in bud for months. Yes, months! And it’s easy. Here’s how you can do it yourself, in an article adapted from The American Cottage Gardener magazine by our good friend Nancy McDonald.
“Choose perfect buds of semi-double to double varieties (the heaviest ‘bomb’ types and singles don’t work as well). In the cool of early morning or late evening, cut buds on six-inch stems, just as the petals begin to loosen but are not yet open. Place in gallon-size, zip-lock freezer bags. I put ten to twelve buds per bag, with half the heads facing one way and half the other. Wet a small, new, cellulose sponge or clean dishcloth, wring it out so it’s just barely damp, and put it in the bag. Gently work as much air as possible out of the bag and seal it. Store flat in your refrigerator. You may wish to put the bag in a plastic storage box, so the buds don’t get bruised by people rummaging for that last chicken leg. Make sure everyone in the house knows that they are not to be eaten.
“After the peonies outdoors are just a fragrant memory, start enjoying your stored ones. Cut an inch of stem (underwater is best) and put the peony in water all the way up to the bud. Within half an hour it will begin to open. Arrange in a vase or float in a bowl of water (a charming way to display peonies anytime). Floating ones seem to last longest. Trim stems an inch shorter each day, if needed. Using this simple technique, I have stored buds for as long as three months, and dazzled everyone with bouquets in early September.” (May 2011)
When Bulbs Don’t Bloom: Top 10 Reasons Why
Most bulbs are easy to grow, and of course we guarantee everything we sell 100%. But sometimes even the best bulbs don’t bloom well. If that ever happens in your garden, it might be because:
1. Leaves removed too early. (To multiply and recharge for future bloom, bulbs need to photosynthesize. The more the better, so leave foliage alone until it yellows.)
2. Planted too late. (Bulbs need to establish good roots before the ground freezes. Bulbs stored too long, especially small ones, may dry out so much they struggle or fail.)
3. Fall was too dry. (Good root growth in the fall is essential for good bloom in the spring, and roots can’t grow well in dry soil.)
4. Too much shade. (Most bulbs need plenty of sun, more the further north you garden. As nearby trees and other plants grow, once sunny areas may become too shady for bulbs.)
5. Soil too wet. (In heavy, clay, or water-logged soils, many bulbs struggle or rot. Plant in sandy to average soils, improve heavy soils with organic matter, or plant in raised beds. Even average soils can be too damp for some bulbs during their summer dormancy. This is especially true for tulips in the rainier eastern half of the country and in gardens that are regularly watered.)
6. Over-crowded. (As bulbs multiply they can become so congested that they’re starved for moisture and nutrients. Gently dig and divide.)
7. Too small. (You’ll never have this problem with our bulbs, but under-sized bulbs are widely sold. In difficult conditions, even the best bulbs can dwindle until they’re too small to bloom.)
8. Wrong climate. (Both winters and summers can be too cold or too warm, too wet or too dry, depending on the type of bulb. Tulips, for example, need a certain number of winter hours below a certain temperature or they won’t bloom, and they rebloom best where summers are dry.)
9. Under-fed or over-fed. (Bulbs can starve in nutrient-poor soils, but over-rich soils cause problems, too. Too much nitrogen, for example, spurs leaf growth at the expense of flowering. Let a soil test guide you.)
10. Animals, insects, or diseases. (Burrowing rodents and daffodil flies can eat bulbs, leaving little trace, while other pests attack their flowers and foliage. Learn more here.)
Whew! The good news is that most bulbs are tough and adaptable. And once you understand what they need, it’s even easier to keep them blooming gloriously year after year. (April 2011)
Better Blooming Rain Lilies in Pots
“How can we get our rain lilies in pots to bloom en masse instead of a few at a time?” we asked our good customer and rain lily breeder John Hubstenberger of Jonesboro, Arkansas.
“Almost all rain lilies bloom well in pots,” John told us, “and most varieties will bloom repeatedly if the growing season is long enough. By stressing the bulbs, it is possible to synchronize their bloom cycles — and 50 Zephyranthes in full bloom in a 10-inch pot are really a sight to see. However, in my experience maximum bloom occurs when the plants get lots of TLC, regular watering, and fertilizing when in active growth. I like to use Carl Pool’s BR-61 with trace minerals for fertilizer. I think warm temperatures, lots of sun, and regular watering give more flowers in the long run than drought and flood. (Some varieties seem to benefit from a bit of chilling when dry and dormant, too.) Of course Mother Nature gives them drought and flood, but in a pot maximum bloom comes from consistent care.” (March 2011)
A Master’s Advice for Choosing Daylilies
Christopher Lloyd grew thousands of plants in his world-famous gardens at Great Dixter, and he evaluated them all with the discriminating eye of an artist. For choosing daylilies that look great in your garden — not just in a catalog close-up — he offered this advice in Christopher Lloyd’s Garden Flowers:
“Don’t be carried away by a single bloom seen out of context....
“While being dazzled by large blooms, remember that small-flowered Hemerocallis are the most prolific. Furthermore, their individual flowers tend to die off discreetly, whereas large-flowered kinds really need dead-heading every morning, to prevent the colony from becoming slovenly....
“As with so many ‘improved’ plants, enlarged flowers are often matched by an increase in leaf size and coarseness. Watch out for this. Then again, the naked flowering stem should present its blooms well above the foliage, this being the graceful effect that gives the flowers style....”
To see exactly what he’s recommending, try a couple of our graceful, prolific, Christopher-Lloyd-style daylilies in your garden this spring. (March 2011)
Our Favorite Heirloom Garden Sources
January is seed catalog month, and our mailbox has been overflowing with temptation. For a list of some of our favorite mail-order sources for heirloom seeds and plants, check out our “Groups and Sources” page. And if we’ve missed one of your favorites, please let us know! (Jan. 2011)
Amazing ‘Atom’ and Tips for Perennial Glads from Zone-5 Idaho
Our customers are continuing to report success in over-wintering their glads outside. Daniel Ostenberg, for example, emailed us this past August:
“I live near Naples, Idaho, 35 miles south of Canada. It’s zone 5. I forgot an ‘Atom’ glad two winters ago while digging the rest of them and it came up the next spring. We did have good snow cover that winter and it wasn’t cold long before it snowed. I do have a neighbor nearby who mulches her glads every fall with six inches of straw and never digs them and she says they do fine. [Idaho’s relatively dry weather and well-drained, alkaline soils probably play a role in this success, too.]
“Also I saved some little bulblets from my ‘Atom’ last fall and planted them this spring in a container and four out of five of them are blooming. I didn’t think they would bloom the first year.
“One of the best gardeners I know told me that glads love calcium nitrate but she couldn’t find any. I’m an ex-apple farmer from the East Washington apple country, and I always get calcium nitrate from the ag-supply companies in apple country. I use it on my glads and get it for her for the 1000 glads that she grows. Orchardists use a lot of calcium nitrate. Trees love it.
“I’m going to leave one each of a few other kinds of glads in the ground this fall and mulch them heavily with straw and see what happens. I’ll let you know next summer how it turns out.” (Dec. 2010)
Pleasures of the November Garden
If the short, cold days of November have you feeling a bit gloomy about your garden, here’s a pep talk from one of the 20th century’s greatest gardeners, Vita Sackville-West, creator of England’s iconic Sissinghurst Gardens.
“If it is true that one of the greatest pleasures of gardening lies in looking forward, then the planning of the next year’s beds and borders must be one of the most agreeable occupations in the gardener’s calendar. This should make October and November particularly pleasant months, for then we may begin to clear our borders, to cut down sodden and untidy stalks, to dig up and increase our plants, and to move them to other positions where they will show up to greater effect. People who are not gardeners always say that the bare beds of winter are uninteresting; gardeners know better, and take even a certain pleasure in the neatness of the newly dug, bare, brown earth.” (Nov. 2010)
Garden Tips for Late Winter and Earliest Spring
Crocus, snowdrops, and other bulbs start to emerge earlier than many gardeners realize, especially in warm spots where the snow melts first. Matted leaves and winter mulch can distort their growth, so get out there EARLY and gently loosen or remove.
Rabbits and other animals love to eat crocus, so you may want to spray emerging buds with a repellant like Ro-pel. Check to see if you have some on hand before you need it. Tulips and lilies are two later-emerging animal delicacies that may also need spraying.
Now is a good time to wash any pots that you’re planning to start dahlias or cannas in, too. Finish by sterilizing them for a couple of minutes in a mix of 10% bleach and water. (March 2010)
Daylilies Unfazed by Sidewalk Salt
“Sidewalk salt has a way of killing almost everything it touches,” writes Diane Selly of Minnesota’s Earthworks Gardens, and “with the extra snow and ice this year, you may be using more than usual.” Diane recommends switching to sand whenever possible, and adds that “some plants are salt tolerant and work great as edging plants along sidewalks or driveways: most daylilies, some hostas, some roses, some heucheras, and some ornamental grasses.” (Feb. 2010)
How Many Bulbs Do I Need for This Space?
To easily answer that question, check out our new web-page, “Bulbs per Square Feet: For Pattern-Beds or Anywhere.” There you’ll find a few simple charts and formulas to help you figure out (a) the square footage of any planting area and (b) how many bulbs you’ll need to fill that space, be they crocus at 3 inches apart, lilies at 18 inches apart, or anything in between.
But we didn’t stop there. Hoping to inspire you to try a bit of historic pattern-bedding, we added . . . (Oct. 2009)
Bulls-Eyes and Stars: Planting a Victorian Pattern Bed
With antique images and advice from historic catalogs, our new web-page “Bulbs per Square Feet: For Pattern-Beds or Anywhere” will show you how to plant bulbs in true Victorian style. It’s easy and fun — and not just for Keukenhof or the lawns of Victorian mansions. Take a peek! (Oct. 2009)
Book of the Month: The Truth About Organic Gardening
Cool-headed, down to earth, and funny, Jeff Gillman is a hort science professor who’s trying to help gardeners make their own, educated decisions about gardening organically or not. Instead of polemics, he offers clear explanations backed up by plenty of facts and a broad context for weighing the pros and cons.
Most of the book is devoted to an item-by-item discussion of all sorts of organic and synthetic choices for improving the soil and controlling weeds, insects, and other pests. For each option, Gilman includes its Environmental Impact Quotient, a number which quantifies (as best as possible) just what it says, and he ends his discussion of each with a handy three-part summary of Benefits, Drawbacks, and The Bottom Line.
The Truth About Organic Gardening is currently ranked as Timber Press’s #11 best-selling book. Though I borrowed it from our local library, after reading it I was so impressed that I bought a copy for my staff to read and for future reference. I expect we’ll be using it a lot, and my guess is you would, too. (June 2009)
The Frugal Gardener: Investing in Your Garden Pays Off
There’s always something interesting to read at GardenRant.com. Jeff Gilman, an associate professor of horticulture at the U of Minnesota, cited some recent research about “What Landscaping is Worth”:
“Readers probably realize that nice landscaping can help sell your home, but exactly how much extra is this nice landscaping worth to buyers? Well, 75 homes in Lubbock, Texas, were examined to determine how much and it turns out that a high quality landscape increases the sales price by 5.7% compared to average landscapes. Then comparing average landscapes with excellent ones, the difference in sale price is a whopping 10.8%. Furthermore, the authors calculate that every $1.00 spent on the landscape returns $1.35. I’m obviously investing in the wrong place.” (Apr. 2009)
Got Too Many Plastic Pots? Try This!
If your pile of empty plastic pots and cell-packs is getting dangerously high because you hate to send them to the landfill, here’s an earth-friendly solution. Last fall our friends at Milwaukee’s Boerner Botanical Gardens and UW-Extension hosted a Plastic Pot Recycling Weekend. They invited local gardeners to bring in their empty plastic pots, cell-packs, garden trays, hanging baskets, fertilizer and mulch bags, greenhouse poly film, irrigation drip tape, and landscape edging to be shredded on site by a company that makes plastic lumber for decking and outdoor furniture.
With the help of 50 Master Gardener volunteers, the event netted a staggering 21.5 tons of plastic! Another weekend is already in the works, and we’re hoping maybe you’ll be inspired to help get one started in your neck of the woods. To learn more, email patrice.peltier@ces.uwex.edu or call 414-525-5638. (Feb. 2009)
The Frugal Gardener: No Need to Buy a Monet, Just Garden Like Him!
For the last twenty years of his life, Monet painted only one subject: his gardens in Giverny. Many bulbs played a leading role in those gardens, and it seems his taste for bulbs was shaped, at least in part, by financial difficulties in his early years.
In Monet: The Gardener (2002), Sidney Eddison writes: “Today, water lilies continue to float on the pond at Giverny. In May, irises in every imaginable shade of blue and violet bloom in their long, narrow beds; in June, roses smother the metal arches along the front walk. By midsummer, gladioli stand tall among the nasturtiums, which have begun their headlong rush toward the middle of the path. And in the fall, dahlias lavish their rich colors on the beds. The gardens, now open to the public, are the property of the Academie des Beaux-Arts. But Claude Monet still owns them.”
In the same book, Robert Gordon writes of Monet’s early career: “Given his precarious finances and the temporary nature of his abodes, many of the plants he chose were annuals . . . or corms, such as gladiolus, which can be dug up in the fall and saved from year to year. At Argenteuil, Monet planted gladiolus corms by the hundreds. In a painting simply titled Gladioli of 1876, . . . [Monet’s wife] Camille . . . gazes wistfully at cheerful ranks of pink, red, and bicolor flowers. . . . Two years later, in a work depicting Monet’s new garden at Vetheuil, gladioli appear again, but this time growing in decorative blue-and-white ceramic containers — a reminder of the impermanent nature of these early gardens. The same containers ultimately found a home at Giverny.” (Jan. 2009)
Don’t Pack Up Those Xmas Lights: Extreme Gardening in Minnesota
Last winter when we wrote that hardy bulbs are rarely bothered by mid-winter thaws, our good customer Bonnie Dean of Minnesota offered a different perspective:
“I live in Minneapolis. Occasionally we get a week of spring-like weather in February, once as high as 76 degrees. The bulbs are fooled — up they come! By the time the shoots are about 3 inches high, the usual teens to twenties temperatures come back and stay for weeks. In those situations, the plants do die. Or they end up blighted and stunted, taking years to recover, if at all.
“But I found a way to circumvent this. Each year when I pack away the Christmas decorations, I make sure a few strings of the small lights are kept accessible. Then, when a prolonged mid-winter thaw is followed by even more hard, hard cold, I get out the lights. I plug them into the outside outlet and string them along the ground, around and between but not touching the emerging daffodils and tulips. (I am careful to remove dead leaves on the ground so there is nothing flammable near the lights.)
“Then, using old pizza boxes or whatever cardboard I have on hand, I make long low ‘tents’ over the plants and lights. Over that, to keep out the wind and keep in the warmth, I put old blankets, worn out bathroom rugs, frayed towels, whatever — even old painting tarps. I keep the lights plugged in until the temperature approaches 32 degrees more consistently, as long as it takes.
“The little bit of warmth from the bulbs keeps the soil just warm enough to keep the tender shoots alive. So, instead of shriveling in the hard winter, the shoots hold their own and even grow a bit. As a result, I have the most showy, prolific and early daffodils in the neighborhood. Some years, I have had the ONLY daffodils in the neighborhood!
“Please share this idea with your readers. Here in Minnesota, even hardy bulbs can lose their zip when the weather fluctuates as much as it does these days.” (Dec. 2008)
If Javelinas Roam Your Garden, Plant Iris!
Though we didn’t include bearded iris on our recent list of animal-resistant bulbs, our good customer Louise Coulter of Payson, Arizona, emailed us to vouch for them:
“In my area which is at 5,000 feet in Arizona’s northern section there is an animal called javelina or wild pig. With cloven hoofs, tusks, and large foraging families, it devastates unprotected bulbs in gardens — except for iris. Seems they can’t eat iris. So at thousands of homes here, where the yards are unfenced, iris naturalize and are ubiquitous. Seems the local nurseries obtained a limited color palette of them each year, so one can almost tell how old the bulbs are by their color. For years one could only get shades of variegated purple and a lovely pale salmon.” (Nov. 2008)
Easy Tips for Making Your Bulb Bouquets Last Longer
We found the expert, down-to-earth advice in Garden to Vase: Growing and Using Your Own Cut Flowers so helpful that we asked author Linda Beutler if we could post excerpts from it at our website. She was glad to help (thank you, Linda!), so check out our new “Bulbs as Cut Flowers” page at oldhousegardens.com/BulbsAsCutFlowers . There you’ll find both cut-flower fundamentals and bulb-by-bulb specifics (“harvest peonies in the ‘soft marshmallow’ stage,” for example) for everything from Abyssinian glads to tulips. (Sept. 2008)
The Frugal Gardener: Don’t Bury Your Money in the Yard, Plant Bulbs!
In troubled times like these, flower bulbs are one of the smartest investments you can make. And what other luxury costs so little? For a few dollars you get months of anticipation, weeks of beauty, fragrance, and pride when they bloom, and — as long as you meet their simple needs — they multiply happily year after year. We’re keeping our fingers crossed that the Fed knows what it’s doing, but we’re also hoping that you’re like us — and that nothing’s going to stop you from planting some very special bulbs this fall. (Sept. 2008)
“So Natural an Act”: Words of Wisdom from a Garden Artist
Robert Dash is not only a highly regarded artist but the creator of a remarkably personal and inventive garden on Long Island called Madoo. In an April 2006 article in Horticulture, Dash offered the following “best advice for fellow gardeners” and we liked it so much that we’ve been trying to squeeze it into our newsletter ever since.
“To garden is so natural an act that you need only follow your instincts; have no fear and plunge right in.
“Follow your first, not your second, idea.
“Expect mistakes; mistakes are not errors if you learn from them.
“Walk your plot in all kinds of light, all times of day, all kinds of weather, as often as possible — paying particular attention to slight changes of level and, above all, shadows.
“Gardening, remember, at its best, is a form of autobiography, an art of the wrist, like painting, enacted on the earth.” (July 2008)
Book of the Month: Garden to Vase
If you like picking bouquets from your own garden — and who doesn’t? — here’s a refreshingly down-to-earth guide full of great advice for getting all sorts of flowers to look better and last longer when cut. Did you know, for example, that your daffodils will stay in top shape much longer if you let them sit for twenty minutes in a bucket of water while their gooey sap drains out? And Garden to Vase goes way beyond technical advice. Author Linda Beutler writes as if she were your next-door neighbor, offering tips for collecting vases, using what you already grow, and making cut flowers an everyday pleasure in your home. She’s funny (did you catch her OHG-inspired Christmas carol in our December newsletter?), encouraging, irreverent, and real. “Don’t be afraid to get this book dirty,” she writes, and we plan to do just that. (Jan. 2008)
Suite101.com Debuts Garden-Catalog Reviews
At Suite101.com, the popular on-line magazine, Angela England has launched a series reviewing highly-rated garden catalogs and websites — and we’re proud to say she chose us for her very first review!
Our website, she writes, “is like a good cottage garden,” and she praises our “very helpful” newsletter, among other things. To read it all — and her other reviews — go to garden-catalogues-nurseries.suite101.com/article.cfm/old_house_gardens_review.
And then if you’re in the mood, email us your own review. We’re always looking for ways to improve! (Dec. 2007)
Trim Your Flower Beds with a “Victorian Edge”
Writing in the May 2007 Fine Gardening, Kate Feely recommends an edging technique that’s been used by generations of gardeners:
“Your best bet is the natural or Victorian edge, also referred to as a Victorian trench. This is the most cost-effective edge available, requiring only time and elbow grease.
“To attain this edge, use a sharp spade to make a vertical cut in the turf at the edge of a bed. Remove soil to a depth of 3 to 4 inches, at a 45-degree angle to the freshly cut vertical edge. With a rake, smooth the soil to slope toward the border plants; this creates a beveled cut. Smooth out the remaining soil. If need be, you could rent a bed trencher for a day or hire a local landscaping company to create a trench for you.
“To maintain a clean line, the beds should be retrenched in spring or as needed. A Victorian edge will blend into any landscape and is as effective as any product for providing a barrier to grass and weeds and for containing mulch.” (Nov. 2007)
Save Water: July is Smart Irrigation Month
July is a peak month for watering, so it’s a good time to think about using water wisely. Here are some tips from the Irrigation Association:
“Water only when needed. Saturate root zones and let the soil dry. Watering too much and too often results in shallow roots, weed growth, disease and fungus.
“Consider drip irrigation which allows water to seep into the soil, minimizing runoff and putting moisture at the root zone where plants can use it.
“Water when the sun is low or down, winds are calm, and temperatures are cool to reduce evaporation.” Mid-day watering can waste up to 30%! (July 2007)
If You Mulch with Starbucks, Will Your Bulbs Bloom Sooner?
Here’s a timely tip from our good customer Marianne Montgomery of Fort Wayne, IN:
“Where I live there aren’t many trees so I mulch my newly planted bulbs with a mix of top soil, peat humus, and composted cow manure mixed with a balanced, slow-release fertilizer and Starbucks coffee grounds. Does everybody know that Starbucks bags their used coffee grounds into ten-pound bags and GIVES them away? They’ll even carry them out to the car for you!” (Oct. 2006)
If Mega-Lo-Mart Has Bulbs in August, Why Wait for Ours?
Big-box stores start selling bulbs in mid-August, so why don’t we ship ours till October 1? Mostly it’s a matter of quality. During their summer dormancy, bulbs go through a complex series of changes to get ready to grow and bloom again. For them it’s like getting a good night’s sleep, and if you skimp on it, their performance suffers.
It’s also that we’re tiny and our bulbs are rare. When everyone in the Netherlands is trying to get their bulbs washed, inspected, and shipped all at once, the big guys tend to end up at the front of the line.
But don’t worry. Though we ship orders in the order we receive them, we also expedite orders to customers in the coldest zones, and even there early October is a great time for planting. (Sept. 2006)
Patriotism Helps Protect Cemetery Bulbs
Here’s a seasonal tip from our friend Marty Ross, a terrific garden writer from Kansas City and now Virginia:
“One of my editors told me this trick for establishing bulbs around gravesites: When the daffodils come up, he pokes an American flag into the soil among them, and leaves it there for a couple of months. The mowers go around it.” (March 2006)
Oops! How to Avoid Damaging Bulbs When Digging
Here’s a tip by Diane Jeffery clipped from an old issue of Fine Gardening:
“After digging up one lily bulb three times last spring while planting new perennials, I came up with an idea to prevent this in the future. I took a clear, liter-size, plastic pop bottle and cut the top and bottom off. Then I cut the tube into circles about an inch wide. Now, after planting bulbs, I sink one of the clear plastic circles into the ground in the spot where the bulbs are planted, pushing it down so that it’s level with the ground. Next spring, when I’m ready to plant or move my perennials, I’ll dig up the plastic ring rather than a lily bulb.” (Oct. 2005)
Cool Yourself Off with These Must-Have Whites
We can’t offer you a popsicle in this July heat, but white flowers can be almost as cooling, so here are some of our favorites for your consideration. White flowers are especially lovely in the early evening and diverse enough to devote a whole garden to, as Vita Sackville-West proved to the world at Sissinghurst. (July 2005)
[Our Advanced Bulb Search will give you a complete list of all of our white flowers. How simple is that? Enjoy!]
When Your Bulbs Are Blooming, Ask Yourself . . .
Now is the time to grab a pen and paper and take a long, leisurely walk in the garden. Take notes, take pictures, place markers, draw maps and start itemizing the places in your garden that need more spring flowers. If you wait until fall when it’s time to plant, chances are you will have forgotten what and where bulbs are needed. Take our catalog with you and make lots of notes for your next order. Later you’ll be so glad you did! (April 2005)
One Customer’s Vibrant Bedding Plans
Our good customer Diane McCue of Wethersfield, CT, wrote in response to the Victorian bedding plans we offered in our last newsletter:
“My summer garden plans include a giant circle planted with tall cannas in the middle, then dwarf Mexican sunflowers, and then about 40 dark-leaved basil plants. Another circle will be peach-colored cannas in the middle with ribbon-grass bunches around the outer rim. Last year the giant circle was red and bronze ‘Roi Humbert’ canna in middle surrounded by a shorter canna, then some spider plants (cleome), and then large yellow marigolds. Every year it’s different!” (April 2005)
Get Inspired by a Real Victorian Pattern-Bed
A hundred years ago and more, Victorian gardeners were enjoying many of the same, vibrant, spring-planted bulbs and annuals that are thrilling gardeners again today. So how about jazzing up your lawn this year with a Victorian-style island bed?
For inspiration, take a look at a real 1880s pattern-bed. You could reproduce it in the middle of your own lawn with castor-beans in the center ringed by cannas (our heirlooms, of course!), then elephant ears, coleus, and finally dusty miller.
Or experiment with other plants, old or new, of similar stature and flair, planting the tallest in the center and working outward in concentric circles until you finish with a low-growing annual for a colorful, clean edge. We’ve made some alternative plant suggestions online, but we’d love to hear yours, too. Or email us a photo of your results this summer! (March 2005)
Link of the Month: Finding Expert Local Advice
A great local resource for gardeners is your Cooperative Extension Office. Every county has one; there’s even one in Manhattan! Most have a help line staffed by Master Gardeners who can identify plants and pests for you and answer many, many gardening questions. For the phone number of your county’s, go to the new www.csrees.usda.gov/Extension/index.html and click on your state. (Dec. 2004)
Seasonal Tip: Fertilize Early, Before Bulb Foliage Emerges
Like all plants, your bulbs will do better when their nutritional needs are met, and that usually means fertilizing them every now and then. If you didn’t scratch some fertilizer into the soil above your newly planted and EXISTING bulbs last fall, early spring is another good time to do it, before or as soon as the foliage emerges. Don’t wait too long or you’ll find it’s hard to keep fertilizer granules from lodging in the whorls of emerging leaves where they can burn the tender foliage. Balanced, slow-release fertilizers are best (aim for 8-8-8), but anything other than high-nitrogen lawn fertilizers will work fine. Fertilizing is especially helpful in revitalizing old, crowded clumps of daffodils that no longer bloom well. (Feb. 2004)
Stop the Flop: 5-Second Staking
To keep a wayward hyacinth upright, cut a thin bamboo stake about 12 inches long and run it along the stem from the top down into the soil a few inches (not so deep that you hit the bulb). The florets will clasp the stake, and you’re done! (2002-03 catalog)
Keeping Cannas in Pots Well-Watered with Less Work
Our good customer Melissa Oldsberg of Chaska, MN, writes:
“I like to plant my cannas in large pots on the deck, but they like a lot of water and can dry out quickly there. So I use ‘rain gel’ granules in my pots. They’re a potassium-based, ‘super-absorbent polymer’ (which works much better than the sodium-based kind). Only one small teaspoon of granules will easily keep a pot of cannas moist for 7-10 days.” (2000-01 catalog)
Hide Yellowing Foliage with “Enthusiastic Fillers,” Says Tasha Tudor
Tasha Tudor isn’t just the beloved author and illustrator of 1 is One, Corgiville Fair and scores of other children’s books, she’s also an avid gardener with a special love for heirloom flowers — including our bulbs! In the April 1998 issue of Horticulture magazine, Tovah Martin shares some of Tasha’s advice for making yellowing bulb foliage virtually disappear:
“Spring arrives late in Tasha Tudor’s New England garden, but when it comes, it arrives with an onslaught of bulbs. . . . However, the bulbs don’t last forever . . . , so Tasha plans ahead for summer.
“Even before the foliage of the bulbs . . . begins to turn brown, an underplanting is gearing up to mount the stage and steal the show. Of course, Tasha will insist that she doesn’t underplant specifically to hide the dying bulb foliage. The forget-me-nots and Johnny-jump-ups . . . now appear in profusion of their own accord. But at one time, they were certainly planted to take up the tempo as the bulbs fade.
“Meanwhile, other enthusiastic fillers take full advantage of Tasha’s hospitality. Feverfew seeds in wherever it finds open ground. Annuals are also tucked here and there in promising nooks and crannies. Sweet alyssum is Tasha’s favorite and most frequently employed annual for the purpose, slipped into the soil wherever it can fill a gap. Later the dianthus flushes out; valerian (Valeriana officinalis) adds flowers, and lady’s mantle (Alchemilla mollis) adds leaves. By June, you would never guess that the garden was once running rampant with narcissus and that beneath the lush garden, bulbs are slowly slipping away.” (1999-2000 catalog)
Garden Wisdom from E. A. Bowles
One of the greatest bulb connoisseurs of the twentieth century, E. A. Bowles was also an insightful gardener. In his 1914 My Garden in Spring, he writes:
“Right letting alone and right meddling are the beginning and the ending of good gardening, and . . . the simplest effects are just precisely those which defy money and ambition and effort and everything but tireless patience, attention, and knowledge bought at first hand with pain.” (1998-99 catalog)
Garden Wisdom from Gertrude Jekyll
Gertrude Jekyll may have been the most influential gardener of the twentieth century. Here’s one of her simple planting techniques that I’ve found very helpful in my own gardening, as explained in Judith Tankard and Martin Wood’s fine Gertrude Jekyll at Munstead Wood:
“One of the secrets of the border’s success [at Jekyll’s home] lay in the style of planting. All her borders were habitually planted in ‘long rather than block-shaped patches’ because, as she observed, ‘a thin long planting does not leave an unsightly empty space when the flowers are done’ [or the bulbs’ foliage is yellowing], especially if the borders were built up in layers, using long narrow-shaped drifts that interlocked and overlapped one another.” (1998-99 catalog)
1927 Advice: What to Plant with Your Bulbs
In his popular 1927 Book of Bulbs, F.F. Rockwell offered four lists of flowers to grow with bulbs:
Annuals to sow between bulbs in early spring: Shirley poppies, California poppies, annual candytuft, godetia (Clarkia), larkspur, lobelia, annual phlox (P. drummondii), moss rose (Portulaca), and Schizanthus.
Plants to set out between bulbs in spring: alyssum, pansies, English daisies, lobelia, annual candytuft, wallflowers, Siberian wallflowers, and forget-me-nots (Myosotis alpestris)
Hardy ground-cover plants to plant with bulbs: rockcress (Arabis), aubretia, basket-of-gold (Aurinia), snow-in-summer (Cerastium), dwarf or creeping Gypsophila, creeping mint, and mossy saxifrage.
Plants to use after removing bulbs: China asters, tuberous and wax begonias (in partial shade), cannas, godetia (Clarkia), geraniums, heliotrope, lupines, marigolds, snapdragons, verbenas, zinnias, and violas. (1996 catalog)
Companion Plants for Spring-Blooming Bulbs
Spring can be even more beautiful when you combine your bulbs with some of these old favorites, listed roughly in the order of their flowering:
Hellebores, aubretia, basket-of-gold, Dutchman’s breeches, bergenia, Virginia bluebells, primroses, cowslips, creeping or moss phlox, bleeding-heart, honesty, forget-me-nots, English daisies, candytuft, woodland phlox (Phlox divaricata), fringed bleeding-heart, lemon lily (Hemerocallis flava), spiderwort, Jacob’s ladder, and dame’s or sweet rocket — for a start! (1995 catalog)