
Growing Bulbs in Pots
Gardeners have been growing bulbs in pots and other containers for thousands of years. It’s a great way to:
- enjoy the fragrance and beauty of flowers up close,
- experiment with bulbs that are new to you,
- easily change the look of your garden every year, and
- grow bulbs that require specialized care.
But you can’t grow bulbs in containers the same way you do bulbs in the ground. Compared to the garden itself, even the largest containers are tiny, cramped, highly artificial worlds where the wrong potting soil, extreme temperatures, or a couple of days without water can mean the difference between success and disappointment. We hope our advice here will help, but please remember that when you grow bulbs in pots, you’re taking the place of Mother Nature, and it’s hard to do that exactly right.
On the other hand, after reviewing this page for us, our good customer and bulb-lover Elizabeth Licata of GardenRant.com offered this encouragement: “If I can do it, anyone can. I am very lazy and try to get through my gardening with as little trouble to myself as possible. So I hope your very detailed instructions don’t scare people off.”
Fall-Planted Bulbs in Pots
(or jump to Spring-Planted Bulbs in Pots )
Indoors for Winter Bloom
To bloom pots of bulbs indoors in the winter, see our “How to Force Just About Any Bulb in Pots of Soil.”
Outdoors for Spring Bloom
Fall-planted bulbs in containers have different needs than bulbs planted directly in the ground. If you treat them the same, you’ll probably be disappointed. If, on the other hand, you follow our advice carefully you can have beautiful pots of spring flowers welcoming friends to your front door or brightening your terrace. Please note, though, that because so much depends on your care, we don’t guarantee the success of our fall-planted bulbs when grown in containers.
When the water in soil freezes, it expands, and that can easily break terra cotta, ceramic, and even rigid plastic pots. To avoid this, plant your bulbs in flexible plastic pots — common black plastic nursery pots, for example — and then slip these pots into decorative cache-pots in spring when the bulbs start to bloom.
As for soil, even the best garden soil is usually too heavy or dense for growing bulbs in pots, and many popular potting soils will cause problems, too. Look for one that’s relatively porous and fast-draining, with a good percentage of perlite, vermiculite, or bark. Avoid mixes that are virtually all peat moss because they often stay too wet for bulbs. Avoid mushroom compost and manure, too.
2. Plant Bulbs Shallowly and Close Together

by Elizabeth Licata, gardenrant.com
Bulbs in pots are typically planted much closer together and less deep than bulbs in the ground. (If, however, your containers are very large and more like garden beds than pots — such as in a roof-top garden — it’s best to stick to standard recommendations for depths and spacing.) Plant bulbs so they’re close but not touching, with their tips just below the soil surface. The goal is to leave as much room as possible under them for root growth. Arrange tulip bulbs with their flat side facing out for a neater display of leaves.
For a more lavish look, some experts recommend setting one layer of bulbs just above another, alternating so that bulbs are not directly on top of one another — but we say leave that to the experts. One layer of bulbs is plenty, and overcrowding can lead to problems.
Another thing we don’t recommend is combining different types of bulbs in one pot. Rooting and blooming times vary so much for different bulbs that the results are often disappointing, especially for beginners.
3. Keep Bulbs Cold But Not TOO Cold
In winter, bulbs in above-ground containers will get MUCH colder than those planted in the ground — where the earth protects them like a huge insulating blanket — and that can be deadly. Even in the coldest parts of the country, the soil a few feet below the surface rarely freezes, and a bulb planted six inches underground will enjoy relatively balmy temperatures compared to one that’s in a pot on top of the soil. Bulbs that are hardy in zone 5, for example, are hardy UNDERGROUND in zone 5, not in an above-ground container where the temperatures can easily be 20 degrees colder. This means you’ll need to store your potted bulbs through the winter in a place that stays colder than 48° F most of the time but that doesn’t get as severely cold as it is outside.

Photo by tanyasgarden.blogspot.com.
Cold is essential, though! Almost all fall-planted bulbs need a certain number of hours below 48° F in order to complete the chemical changes that allow their flower stems to emerge and grow to a normal height. (This is nature’s way of preventing them from blooming during a mid-winter thaw.) The hours of “chill time” needed varies widely — tulips, for example, need a lot, while some tazetta narcissus need almost none — but if you don’t give your bulbs the cold they need, they’ll either bloom on very short stems or not at all.
Finding a spot where the temperatures are just right for your potted bulbs can be a challenge, and it all depends on how cold your part of the country gets. In some areas you can simply set them in the shade on the north side of your house, but in most places this will be either too cold or too warm. If it’s too cold, one choice is to bury the pots in the ground — maybe in your vegetable garden, for example . Put a layer of rocks under the pots for drainage, make sure the bulbs are at least as deep as they’d be if you planted them directly in the ground, and mulch with a foot or two of straw or hay. Or try them in an unheated mudroom, attic, or crawl-space, attached garage, or refrigerator (although see #5 below). If it’s too warm outside — as it may be in zone 7 and definitely in zones 8, 9, and 10 — you’ll need to “pre-chill” your potted bulbs in the refrigerator (not freezer) for 8-10 weeks either before or after planting them.
The best way to monitor temperatures in any of these places, even in the dead of night when you’re asleep, is with a maximum-minimum thermometer, available at any good garden center.
4. Protect from Freeze-Thaw Damage — and Mice, Etc.
Bulbs in pots can also be damaged by what is called the freeze-thaw cycle. Although bulbs in the ground will enjoy relatively steady temperatures, soil temperatures in containers can fluctuate dramatically from day to night. This is even more of a problem for containers in direct sun. During the day soil temperatures can skyrocket, even on a day that’s barely above freezing, thawing the soil and stimulating the bulbs to grow as if it’s spring. Then at night when air temperatures plummet, the soil in the unprotected container quickly cools and can easily freeze. This daily cycle of freezing and thawing breaks roots and weakens the bulbs. To avoid this, keep your containers in a cool SHADED spot until it’s spring and leaves have emerged an inch or more above ground.
Mice, chipmunks, and other rodents can be even more destructive. Jane Baldwin, whose tips for growing bulbs in baskets are featured below, told us that “mice and other critters were the sole cause of failure for me. I think the best solution is to either (a) store the pots in a tight closet in the garage or (b) upturn larger pots over each of them, but I’ve also stored them in old-fashioned galvanized garbage cans.”

5. Use Your Garage and Refrigerator with Caution
Most detached garages offer very little protection from the cold, but they may work for some bulbs in some zones. In other words, proceed with caution. Elizabeth Licata, who gardens in zone-6a Buffalo, NY, stores her potted bulbs in an detached garage and says, “I’ve never lost any tulips, regardless of the size of the pot or the coldness of the winter.” Hyacinths, on the other hand, haven’t done well in her garage, which makes sense because they’re less winter-hardy than tulips.
Attached garages are usually a much better place to store potted bulbs — if you keep the doors closed. The warmest areas are typically higher (heat rises) and next to the wall of the house (where heat radiates out). Unfortunately automobile exhaust fumes contain ethylene gas which can cause flower buds to abort, so if you warm up your car in the garage on cold mornings, you may end up with pots of great foliage in the spring but no flowers.
Ethylene gas is also released by ripening fruit, so if you store your bulbs in the refrigerator, seal fruit tightly in impermeable plastic bags and keep it as far away from your bulbs as possible.
6. Keep Soil Moist but Not Soggy
Since the dry peat moss in potting soil can be difficult to wet thoroughly, water your bulbs well after planting and then let the pot stand in a saucer of water for an hour or more to allow the potting soil to soak up more water. Once you’re sure the soil is wet throughout the pot, remove the pot from the saucer, allow excess water to drain out, and then return it to the empty saucer.
Use your finger to check soil moisture at least weekly throughout the winter. (Put a reminder in your phone or a note on your calendar.) Soil should be moist but never soggy. When the bulbs are just starting to grow, you’ll need to water infrequently, but later when roots fill the pot and top growth emerges, the soil will dry out much more quickly, so pay attention. Remember that a pot is a small, closed system and if your bulbs can’t get all the water they need, all the time, their growth and bloom will suffer.
If your potted bulbs are outside, you may need to protect them from getting too wet in the winter. During extended wet periods, cover the pots or move them to a sheltered spot. Bulbs that stay too wet for too long, especially tulips, will die.
Don’t water when the soil in your pots is frozen.
7. Ease into Spring
If everything has gone as planned, roots will eventually fill the pot and show at the hole(s) in the bottom. Foliage will start to emerge above the soil, and as spring approaches and temperatures rise, it will get increasingly difficult to hold this back. Once the leaves are taller than a couple of inches, move the pot gradually into brighter light and eventually full sun. Water as needed, maybe even daily once flower buds show. In the burgeoning rush of spring growth, it’s hard to overwater bulbs, although even then they never want to be water-logged.
When the buds start to open, move the pot wherever you want — and enjoy!
8. After Bloom, Compost or Replant in the Garden
When blooms fade, you can either (a) compost the bulbs, (b) replant them in the garden immediately, making sure to get their bases as deep as they would be if you had planted them there to start with, or (c) move the pot into a sunny, out-of-the-way spot (ideally buried in the ground to keep the bulbs cool) and keep them growing strongly for as long as possible. When the foliage yellows, empty the bulbs from the pots, dry completely, remove the foliage, and store in a cool, dry, well ventilated spot until it’s time to replant them in the garden in the fall. Although they may not bloom the following year, with luck and good care they’ll bounce back from their life in confinement and bloom again in future years.
Here’s How One Customer Did It: Jane’s Easy Daffodil Baskets
When our good customer Jane Baldwin of zone-6a Moreland Hills, Ohio, found herself with surplus bulbs late one fall, she improvised an easy solution that ended up delighting her.
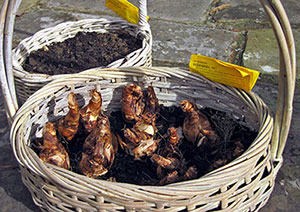
“A couple of years ago,” she writes, “I got caught by early snow so I planted the last of my daffodils in baskets. It looked fabulous and I highly recommend this to anyone, even if you’re not in the same predicament. In fact, it’s how I’m planting most of the daffs I ordered from you this fall.
“The baskets were just ones I found in the garage when we moved in. [If you don’t have any in your garage, thrift shops often sell them for a dollar or two.] They were nothing fancy, older and seasoned by years of
use, approximately 6 inches deep and 1-3 feet across. I put a few inches of good potting soil in them and then planted the bulbs right smack against one another with their tips just barely covered by the soil. Smaller-flowered varieties such as ‘Thalia’ went in the smaller baskets and bigger ones such as ‘Carlton’ in the bigger baskets.
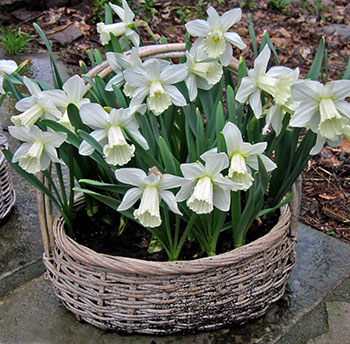
“I put them in our attached garage so they would get the necessary cold, and made sure that mice couldn’t get to them. I watered them at first but eventually the soil froze. At the end of winter when it started to thaw, I brought the baskets out on the patio to a sunny spot where they bloomed to perfection. Even though there were only 2-3 inches of soil under the bulbs and they were planted right next to each other, they performed just fine and looked exquisite in the baskets for a good long time. It was really very easy, and even our chipmunks and squirrels left them alone out there.
“At the end of spring I took the bulbs out of the baskets and kept them dry over the summer in the garage. Now they are planted on a hillside along my driveway where they continue to bloom beautifully — and every fall I plant more in baskets.”
Spring-Planted Bulbs in Pots
(or go back to Fall-Planted Bulbs in Pots )
Most spring-planted bulbs are easier to grow in containers than fall-planted bulbs, and very rewarding. Once you’ve enjoyed the fragrance of a pot of tuberoses in full bloom, for example, we bet you won’t want to garden another summer without them.
Yes, containers are tiny, cramped, highly artificial worlds where even a small mistake can lead to disappointment, but if you follow our advice carefully, you can have pots full of beauty and fun all summer long!
A Few Basic Tips for Success

make a welcoming display at our back door.
1. Choose the Right Pot and Soil
When choosing pots, keep in mind that (a) spring-planted bulbs have a much longer growing season than fall-planted bulbs do and (b) some grow much larger. That means you can’t cram them in as tightly as you would fall-planted bulbs, so you need roomier pots. Some bulbs will also appreciate the cooling protection of a cache-pot. For guidance, see tips #2, #5, and our bulb-by-bulb advice below.
To avoid drowning your bulbs, especially those that will sit out in the rain, avoid pots without drain holes, and glazed or plastic saucers.
Potting soil usually works better in pots than garden soil because it holds more moisture and allows roots to penetrate and bulbs to expand more easily. Quality varies widely, though, so avoid bargain-priced brands, and choose a soil that’s relatively porous and fast-draining, with a good percentage of perlite, vermiculite, or bark.
2. Plant Most Bulbs — But Not All — Separately, Shallowly, and Close Together
Plant most spring-planted bulbs so they’re closer and shallower than they would be in the ground — but not as close and shallow as fall-planted bulbs in pots. The goal is to make the most of the limited space, but since spring-planted bulbs have to support top-growth all summer long instead of for just a few weeks in the spring, they need more room. This is especially true for dahlias and cannas because (a) they get so big and (b) if their growth slows or stops, so will their blooming. See our bulb-by-bulb tips below for guidance.
Like most gardeners, we enjoy combining all sorts of annuals in pots, but in our experience most bulbs do better when potted separately. That allows you to give each type the individualized care it needs to grow and bloom best, and as summer advances you can easily rearrange the pots and move those in full bloom into the spotlight.
3. Water Regularly — Sometimes Daily
The dry peat moss in potting soils can be difficult to wet thoroughly, so the first time you water your newly planted bulbs, let the pot stand in a saucer of water for up to an hour in order to soak up as much moisture as possible.
When bulbs are growing vigorously, pots can dry out quickly. Check the soil with your finger daily, and water as needed to keep it moist but not soggy. Early in the season when bulbs are just getting started and the weather is cool you’ll need to water less, but later when there’s a lot of top growth, the weather is hot, and roots have filled the pot so completely that there’s less soil left to hold moisture, you’ll need to water more — often daily, and sometimes even more!
To help give your bulbs more water when they need it, set a saucer under each pot and water until it’s at least partially filled. Be careful, though, especially when bulbs are just getting started or growth is slow, because constantly soggy soil will cause most bulbs to rot and die. The goal is to give them a reservoir to draw on for a few hours. If there’s still water in the saucer, say, eight hours later, dump it out and water less next time.
Plastic and glazed saucers hold water longer than unglazed terra cotta ones. That can be good or bad depending on the plants’ needs, so keep that in mind when using them.
If your pots are open to the rain, be sure to empty their saucers after every shower to avoid water-logged soil and root rot. This is even more of a danger with pots or cache-pots that lack drain holes, which is why we recommend you avoid them altogether.
4. Fertilize Regularly but Judiciously
Unlike their fall-planted cousins, spring-planted bulbs in pots need to be fertilized. Their growing season is long and their pots are small, so eventually they’ll exhaust the nutrition that’s in the potting soil and their growth and blooming will falter. To remedy this, wait until the plant is in full growth and then simply add a bit of liquid or water-soluble fertilizer to your watering can every few weeks. Although “all-purpose” fertilizers will work just fine, you might want to use something like Miracle-Gro Bloom Booster which has more phosphorus to promote flowering. Of course there are many good organic fertilizers available, too.
Whatever you do, remember that (a) big plants such as dahlias and cannas will need a lot more fertilizer than small plants such as rain lilies, and (b) too much fertilizer can be deadly, so use your green-thumb intuition and fertilize judiciously.
5. Give Them Plenty of Sun, but Protect from TOO Much Heat
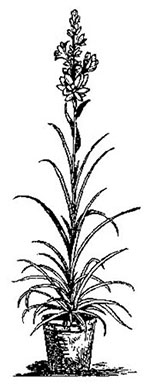
Briggs & Bros., 1875.
Most spring-planted bulbs need at least a half-day of full sun to grow and bloom well, and they’ll do better with more. This is especially true in the north where sunlight is never as strong as it is further south. Of course a spot that’s in full sun in mid-summer when the sun is high in the sky can fall into shade later in the season as the angle of the sun declines, so keep an eye on this and move your pots as needed.
Sunny spots can get very hot, though, which may cause problems for some bulbs. Soil in pots heats up much faster than soil in the ground, and if a pot is set on a deck or paving, or near a south or west wall, it will get even hotter and stay warm longer. In cooler parts of the country, some bulbs such as tuberoses, rain lilies, and crinums will appreciate the extra heat, but glads and especially dahlias won’t.
To keep soil cooler, double-pot your bulbs by planting them in one pot — say a common black-plastic nursery pot — and then slipping that inside a decorative cache-pot. The outer pot will shade the inner pot, and the air space between the two will slow the transfer of heat. Just make sure the cache-pots have drainage holes, to avoid drowning your bulbs.
Another way to cool pots is to raise them even slightly off the deck, terrace, or other hard surface they’re sitting on. Wood, concrete, stone, and brick can all get very hot when the sun is beating down on them, and they’ll hold the heat long after the sun is gone. Although some bulbs will thrive with the extra heat, others will struggle — so see our bulb-by-bulb tips below. To cool pots, raise them (or their saucers) off the deck or paving by setting them on a few small sticks or rocks. Even a ¼-inch air space will help reduce the heat transfer. You can raise pots higher by setting them on overturned pots and other pedestals, but even then providing a bit of air space between the pot (or its saucer) and whatever you set it on will help keep it cooler.
Finally, avoid too much heat by keeping pots away from south and west walls where the sun’s direct rays can create oven-like conditions.
6. Try a Few Pots IN the Garden
Don’t restrict your pots to the porch, deck, or patio. They make great accents and focal points out in the garden, too, and visually link garden and house. Since they’re so portable, it’s easy to switch pots around so the ones in full bloom are always in prime spots, and when a pot of tuberoses starts to bloom you can set it wherever you’ll most appreciate its evening fragrance — maybe even under your bedroom window.
Another great way to enjoy pots of bulbs such as glads or tuberoses in the garden is to plant them in black plastic nursery pots, grow them in an out of the way spot like your vegetable garden or back of the border, and then when they start blooming move them wherever you need some excitement. There’s usually no need to bury the pots. Just set them on top of the soil where the foliage of other plants will mask them from view — and don’t forget to water them whenever you water your other pots.
7. When the Season Ends, Compost or Store
Most spring-planted bulbs aren’t winter-hardy in much of the country, which is why they’re planted in spring instead of fall. And even if they ARE hardy in your zone, that means they’re hardy when grown in the ground — where the earth protects them like a huge insulating blanket — not in pots above ground where temperatures can be as much as 20 degrees colder, the equivalent of two full hardiness zones.

on our old-house porch.
As winter approaches it’s perfectly fine to dump your bulbs out of their pots and compost them, just as you would fuchsias, tomatoes, or any other plants that aren’t hardy in your zone.
If you want to, though, it’s easy to store most spring-planted bulbs indoors during the winter. For example, here in zone 6a we keep our pots of rain lilies growing outside as long as possible in the fall, making sure they get as much sunlight as possible as the waning sun sinks lower in the sky. When the first frost threatens, we move them to a warm spot overnight and then back into the sun in the morning when it warms up again. Weeks later when the weather gets so cold that we’re doing this almost every night, we simply move the pots to a dim, cool, well-ventilated spot on our basement floor and stop watering them completely so the foliage will wither and the bulbs go dormant. Then we put a note in our phone to start checking on them in early spring for the first signs of new growth.
Once green sprouts start to emerge — which is often much earlier than you’d expect — you’ll probably want to move the pot into the sunniest spot you can find and start watering it lightly. However, if warm weather is still a long way off, we often delay that for a couple of weeks and the bulbs seem to cope. The sooner you can get the pots outside in full sun, the stronger the foliage will be, but remember these are tender bulbs and they can’t take as much cold as hardy bulbs such as daffodils. When you start putting them outside, harden them off gradually as you would seedlings you’ve started inside. Leave them for just an hour or two at first, in a sunny spot that’s sheltered from the wind, and then gradually extend their time outdoors a little more every day, giving the foliage a chance to toughen up and adjust to life outside.
Of course you can also empty your pots in the fall and store the bulbs in mesh bags, plastic tubs, etc. See our “care” links below for easy instructions. But remember — composting is also a perfectly honorable choice!
Bulb-by-Bulb TipsCannas
No matter how big of a pot we put them in, cannas never get as big or bloom as much as when we plant in the ground, so be prepared for that. They like heat, so they often do better on decks and paving where it may get too hot for other bulbs. They’ll want a lot of water once they get going, so keep their saucers filled. They’re big plants and the more stalks they produce, the more they’ll bloom, so fertilize regularly. Be careful, though, because if their rhizomes multiply to the point where they fill the pot, they can break it. To learn more, see our complete info on canna care.

Crinums
We grow our crinums in pots, and we love them, but they’re more of a challenge in pots than most spring-planted bulbs are. They’re big bulbs — some will grow to football size over time — and their thick, permanent roots can quickly fill a pot completely. That makes watering difficult and may eventually break the pot. To learn more, read the advice of two of our northern customers, and see our info on crinum care.
Crocosmia
Crocosmia are slender-growing and combine well in pots with other plants, although they’re also striking when grown alone. Give them plenty of sun and water. To learn more, see our complete info on crocosmia care.
Dahlias
Dahlias grow big, so give them as much room as possible, and plenty of water and fertilizer once they get going. To bloom well, they need lots of sun but even more importantly they need to be cool at night, so see our advice in tip #5 above. Don’t forget you’ll need to stake most of them (although short ‘Lutt Wichen’ and ‘Madame Stappers’ need little or no support). In winter, you can store them right in their pots in a cool, dry spot. To learn more, see our complete info on dahlia care.
Daylilies
Daylilies are hardy perennials that need an extended cold period every winter, which means you can’t store them inside. We don’t encourage growing them in pots, but if you want to try it, follow and adapt our advice for FALL-planted bulbs, above.
Gladiolus
We often plant glads in black plastic nursery pots and then when they bloom we set them into the garden wherever a splash of color is needed. As a bonus, the rigid sides of pots help keep glads standing upright better than they often do when planted in the ground. To learn more, see our complete info on gladiolus care.
Iris
We don’t recommend growing iris in pots, but if you want to give it a try, follow and adapt our advice for FALL-planted bulbs, above. (And please let us know how they do!)
Rain Lilies
Rain lilies are great in pots, and were once commonly grown that way, even in the North. For us they seem to do best in pots that are shorter than they are wide, such as those sold as “azalea pots” or “bulb pots.” Plant the small bulbs close together — 50 in a 10-inch pot isn’t too many — and once they get going, water and fertilize them regularly. Bloom may be modest the first year as the bulbs settle in, but with good care they will bulk up and give you more flowers every year. Keep them growing outside as long as possible in the fall — a bit of cold weather may increase future bloom — and then store dry and cool indoors through the winter.
To learn more, read one Wisconsin gardener’s inspiring 100-year-long success story with pink rain lilies — which “thrive on neglect,” she says — and see our advice on rain lily care.
Tuberoses
Richly fragrant tuberoses are our #1 favorite bulb for pots. In the North, we always recommend growing them that way, so you can give them maximum heat and sun. In winter, simply store the pots dry inside in a cool spot. When spring returns, bring them back outside, water and fertilize regularly, and they’ll bloom again. After their second summer, though, the rhizomes will have become so crowded that you’ll need to repot them. To learn more, see our complete info on tuberose care.
Questions? Suggestions?
Please email help@oldhousegardens.com or call (734) 995-1486 for more advice and to help us make this page better.